Wednesday 29 February 2012

My 29 Day Organizational SUCCESS!!


Mission Accomplished!! I have been following along with OrgJunkie's 29 day organizational challenge for the past month and finally have the before and after photos to show the drastic change in my space! 

1. What space did you decide to organize and why?
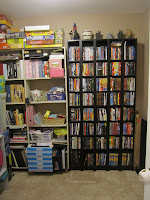
We all have a place in our house that gets filled up with "stuff."  For us, that catch-all room is where our dvds, craft supplies and books/photo albums are stored. It is also the space where random items get shoved until they find a new home.  It was in a complete state of chaos.  This challenge gave me the motivation to make a change.
 
Before                              After

2. What steps did you take to ensure you completed the space within the 29 day timeline?
To make sure I could complete this task in 29 days, I needed a plan.  First, you can't enter the contest until you get a blog - so I started GingerBabyMama.  Then I went old school - got out a pen, paper and calendar.  I checked the calendar to try to find some hours in the month to dedicate to the project.  Then I used pen and paper to map out the space, the furniture and storage options I have and can use in the space.  Then I buckled down and got to it!

            
Corner of the Room               Bookshelf that was moved
                                            from the other corner

3. What was the hardest part of the challenge for you and how did you overcome it?
The hardest part of the plan was making the time to lock myself in the windowless room while not completely ignoring the kids.  After a long day of working and mommying it's tough to want to clean/purge/organize.

4. What did you do with the “stuff” you were able to purge out of your newly organized space?
I managed to get rid of three BIG boxes of books, craft supplies and random crap that was stored in the space.  I also purged a huge hutch, a file cabinet and a small shelf.  The furniture found new homes with my mom and sister.  The rest filled up the trunk of the station wagon and off to the VV Boutique!

            
DVD and board games before and after!! 

5. Tell me one of your proudest moments during this challenge?
For me, the proudest moment of this whole journey was my mom saying she was impressed and that the space looks great.  Her house is always spotless and she doesn't craft, so she saw the space as completely insane.  When she was impressed with the improvement, my heart soared!


6. Explain any organizing “tools” you used to help you create additional space and to establish some limits and boundaries?
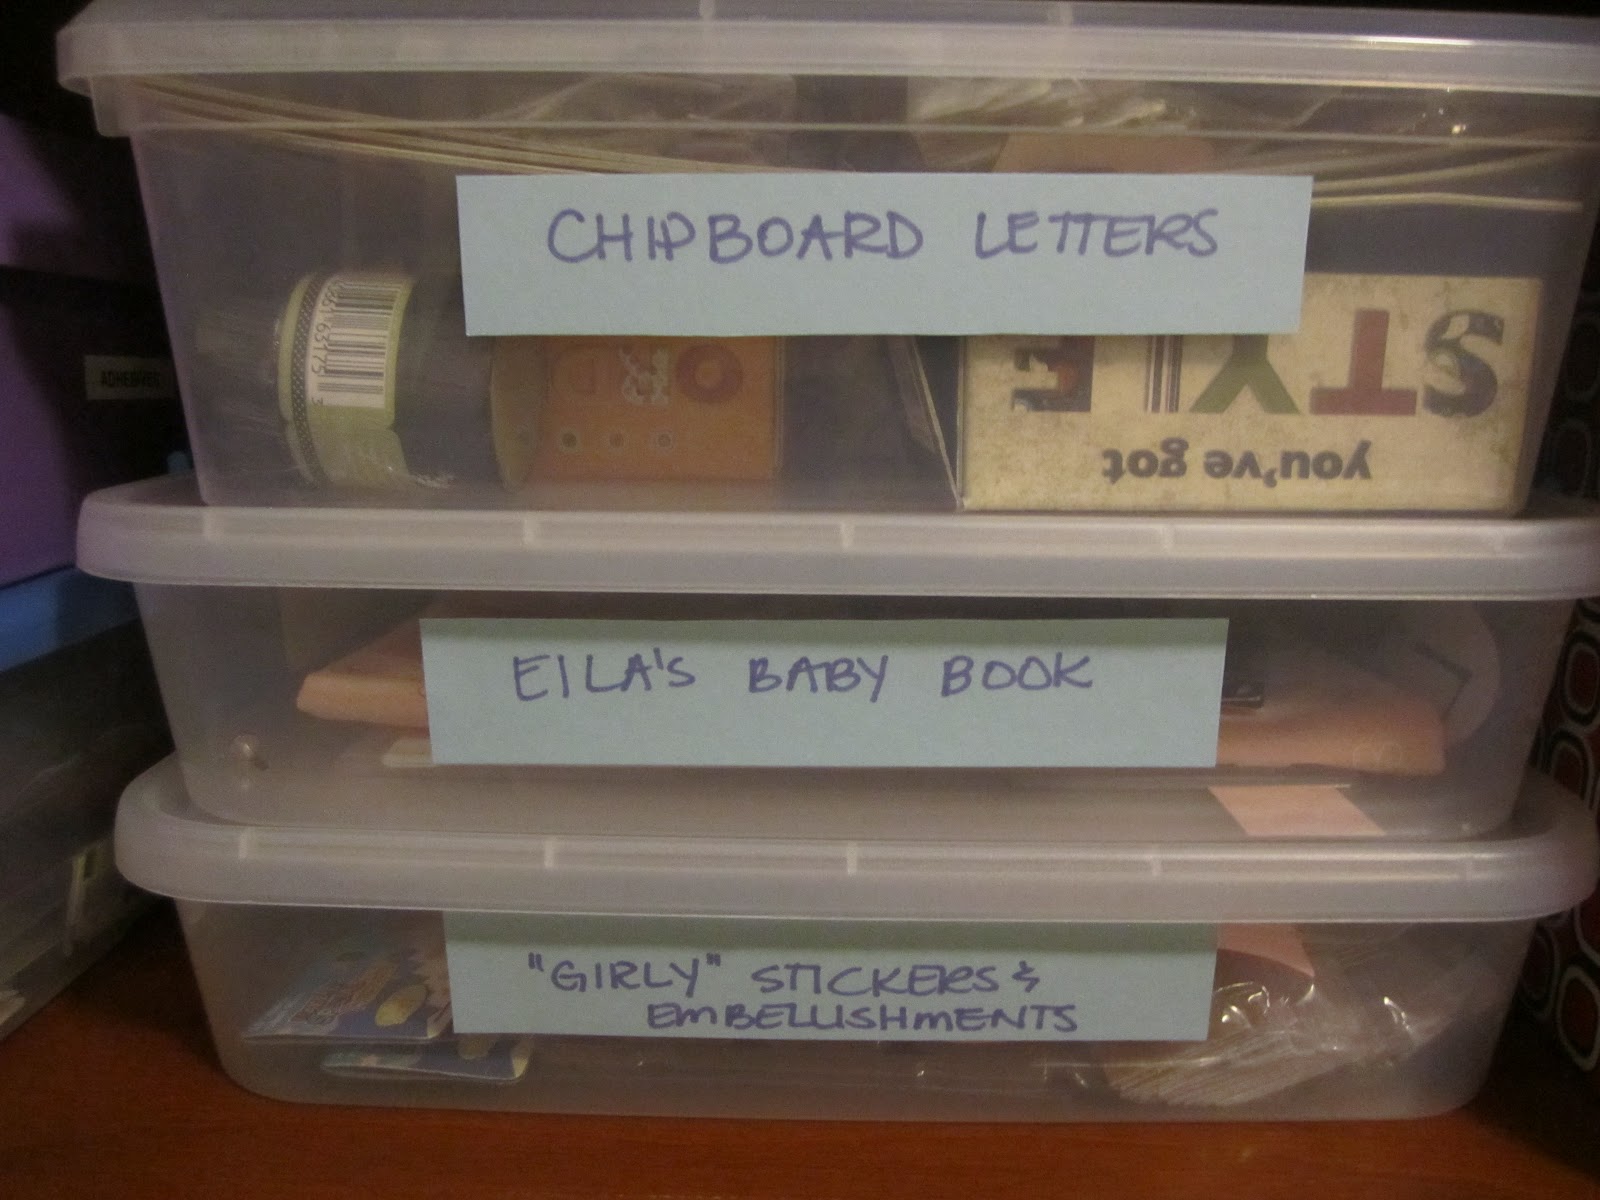
I didn't buy any containers/furniture for this space.  I repurposed existing containers and made my own labels with cardstock that I had on hand.  I used baskets and bins to corral like items. 

7. What is ONE piece of advice you’d give to someone else to encourage them on their organizational journey?
The best piece of advice I can give someone wanting to start organizing a space I read on a fantastic minimalist blog - Zen Habits - Start with one space, one shelf, one item and go from there.  Unless of course you want to sort/purge/organize your whole house - in that case, use the PROCESS and organize everything in 52 weeks! It worked on my house!

Here are the links to my progress on this journey:

http://gingerbabymama.blogspot.com/2012/02/before.html

http://gingerbabymama.blogspot.com/2012/02/progress-but-still-long-way-to-go.html

http://gingerbabymama.blogspot.com/2012/02/were-almost-there.html

Thanks so much for OrgJunkie's 29 Day Organizational Challenge - it's a great motivator and now I have this fun blog to fill my time and challenge me some more AND I have an organized craft space!

Tuesday 28 February 2012

Chicken and Black Bean Quesadillas


OMG.  Tonight I made the most delicious dinner.  It was fabulous, it was healthy, and it was easy!

A little over a month ago, I made my first attempt at freezer cooking.  Since it was my first try, I didn't want to run around gathering recipes and doing calculations and all of that nonsense.  I found a website that had one woman's entire freezer cooking day, with ingredients, lists (I love a good list!) and super easy instructions.

One of the recipes on her list is Chicken and Black Bean Chili.  I'm not usually a huge fan of chili, but I figure it can be a good thing to make for lunches on the days that I work, and maybe I could use it for other things.

Well today is that day. Today I just took one of the bags out, let it defrost and made tonight's yummy dinner!

Chicken and Black Bean Quesadillas
1/4 of Chicken and Black Bean Chili recipe (see below)
8 Tortilla shells
3 Red, yellow and/or orange peppers, sliced
1 Tbsp Fajita Seasoning
1 cup grated cheddar cheese


Simmer the chili on the stove to reduce some of the liquid in the mixture.

Saute some peppers. Set aside the peppers for a few minutes. 

In the same pan as the peppers, spray pan with Pam.  Place a tortilla into the pan, place a few peppers on top (I used a whole bunch, they are my favorite!), top with a good scoop of the chili, and some grated cheddar cheese.  Put another tortilla on top.

When the bottom tortilla has browned a little, carefully flip the entire stack of yummy goodness over, trying to contain all of the filling ingredients  (it's tough!).

Once the other side of the quesadilla has browned a little and all of the cheese is delicious and melty, slide it onto your plate and enjoy!

Chicken and Black Bean Chili

The recipe makes 4 - 4 cup servings of chili, which I packaged in freezer bags and stacked in my freezer.

4 chicken breasts - boiled & shredded
56oz tomato sauce
30oz black beans
30oz corn
2 onions - diced
4 stalks of celery

A few big tablespoons of Fajita Seasoning (or you could use 2 packets chili seasoning)
garlic

Chop everything up, throw it in a pot/crock pot and let it simmer for an hour or two.


Bon Appetit!!

Monday 27 February 2012

Winner Winner, Chicken Dinner!


It’s Monday, so it is time to figure out what we are having for dinner this week.  After all the fun and craziness of the past weekend, with Eila’s birthday party, it will be nice to have some fresh, home cooked meals this week. 

I notice that my freezer cooked meals are dwindling down to almost nothing!  The only things we have left are a couple of meat loaves, some chilli and spaghetti sauce – I think I’ll do another big cook this week to replenish the stock.
For dinner this week, I plan to use up all of the vegetable platter leftovers from the birthday party in a stir fry and some frozen cooked ham in yummy calzones.

Monday: Teriyaki Chicken Stirfry with Chow Mein Noodles 
Tuesday: Chicken and Black Bean Quesadillas

Wednesday: Ham and Veggie Calzones with French Fries
Thursday: Spaghetti and Meat Sauce with Garlic Breadsticks 

Friday: Beef Enchilada Bake
Saturday: Fend for yourself day!

Sunday: Freezer cooking day!  We’ll eat whatever looks the best that day!
I am linking up to Org Junkie’s Menu Plan Monday ~ Check out some great recipes and ideas there sometime!

Bon Appetit!

Sunday 26 February 2012

Our Little Bean Turns 3!!


What a crazy, awesome, fun, busy, amazing weekend! 

Our little Eila Bean turned three years old today.  And yesterday we put together a great party with lots of fun, friends and crazy small children.


Eila wanted a Max and Ruby Bunny Party, and I tried my best to put it all together for her. 

We played freeze dance, pin the bunny tail on Max, ate carrot cake cupcakes and opened a HUGE pile of presents.  Thanks so much to everyone who made Eila's birthday a great day!

As promised, here is the recipe for the Carrot Cake with White Chocolate Cream Cheese icing.  My sister and I made the flowers on the cake using   gumpaste/fondant mixture (thanks Nicole)

Carrot Cake
2 cups Sugar
1 1/2 cups Vegetable Oil
4 Eggs
2 cups All Purpose Flour
2 tsp Baking Soda
2 tsp Baking Powder
1 tsp Cinnamon
1/2 tsp Nutmeg
1 tbsp Vanilla
3 cups Grated Carrots
Preheat oven to 325F
Butter and flour a bundt pan, or 3 8 inch round pans.
Mix oil and sugar
Stir in your eggs.
Add in the carrots and hazelnuts, if using.
Sift in your dry ingredients and carefully fold them in, being sure not to overmix.
Pour into your prepared pan and bake until an inserted skewer comes out with only a few moist crumbs, about 45 minutes.
Flip out of the pan and allow to cool completely.


Icing
2 ounces white chocolate
1 (8 ounce) package cream cheese, softened
1/2 cup unsalted butter, softened
1 teaspoon vanilla extract
1/2 teaspoon orange extract
4 cups confectioners' sugar
2 tablespoons heavy cream

In small saucepan, melt white chocolate over low heat. Stir until smooth, and allow to cool to room temperature.

In a bowl, beat together the cream cheese and butter until smooth. Mix in white chocolate, 1 teaspoon vanilla, and orange extract. Gradually beat in the confectioners' sugar until the mixture is fluffy. Mix in heavy cream.


    Friday 24 February 2012

    We're Almost There!


    I can see the light at the end of the tunnel!  Last weekend I got to spend three whole hours while Aidyn was at a birthday party and Eila was napping working on the craft storage room.  I pulled apart shelves, I made labels, I sorted, organized, purged, stocked and prettified as much as I could. 

    I know that there is still work to do – especially with organizing my old printed photos, and sorting my ridiculously huge sticker collection (and don’t get me started on the amount of paper I have, I know, I’m crazy...) but I feel so much better knowing that all the stickers are together, I know where to find my scrapbook adhesive, the Cricut has a home, and so do the Rock Band instruments, my gift wrapping storage container, and my travelling scrapbooking totes.

    I managed to get rid of three pieces of redundant furniture (two to my sister for her organizing projects, and one to my mom’s house to contain some of the kids toys she keeps at her place). 

    Thanks so much to OrgJunkie for the motivation and push to get this project going – it was a long time coming, but totally worth the hours and hours it took to sort out. 

    Thursday 23 February 2012

    It's Almost Party Time!


    My little tiny princess Eila turns the big T H R E E this weekend – Can you believe it?  When we asked her what kind of birthday party she wanted, she thought about it for a few minutes and declared that she wanted a Max and Ruby Bunny Party.

    For those of you who don’t know about the Max and Ruby show, let me tell you a little bit about it.  They are two little cartoon bunnies, who seemingly have no parents.  Ruby is super bossy and tells Max what to do all the time, and they have a Grandma who checks in every now and again.  It’s strange, but both of my girls love it.

    Since we are having the party in our complex amenities room, I made some pretty tissue paper pompoms for decorations.  I also got my craft on and put together a super cute happy birthday banner!  I used the Mickey Mouse font cartridge and cut out the letters to spell out Happy Birthday Eila.  I also used the Cricut to cut out the regular circles, and the scalloped edge circles.

    In keeping with the bunny theme, I made little carrot shaped treat bags. I just filled a cone shaped treat bag with goldfish, tied it off with cute green ribbon, and ta-da!

    I also used my Cricut to cut out some hot pink scalloped edge circles in a smaller size and printed out little pictures of Max and Ruby (found randomly on the internet). I glued these onto some old cupcake picks I had from a previous event and they work perfectly for the birthday cupcakes!
    Tonight’s project includes baking carrot cupcakes and a carrot cake and decorating them for the party on Saturday.  I will be using Just Something Pretty’s Carrot Cake recipe and a white chocolate cream cheese icing.  You’ll have to wait until tomorrow to see these... it’s going to be a LONG night tonight!

    Tuesday 21 February 2012

    Happy Shrove Tuesday Everyone!

    Well the menu plan went out the window today!  The original plan was for chicken and black bean quesadillas, but I realized this morning that it's Shrove Tuesday, Mardi Gras

    For my entire life, my mom has always made these amazing skinny pancakes covered in sugar and jam on Shrove Tuesday.  So today I went over to my mom's house to get a copy of the recipe.  She broke out what can only be described as a "vintage" cookbook, well loved, cover fallen off years ago, pages stained with water marks - a truly loved recipe book. 
    When I went to the house to pick up the recipe, I noticed that she was using her mixer to mix the batter  When I usually make pancakes, I just whisk the ingredients together and away we go.  Mom told me that the mixture needs to be really really thin to make them perfectly. 


    Ingredients:
    1/2 cup flour
    2 eggs
    1 cup milk
    2 tbsp margarine
    Sugar
    Jam

    In the bowl of the mixer, place 1/2 cup of flour. Make a well in the flour and crack the eggs into the well.  Add half of the milk and mix on low speed for 4-5 minutes.

    Mix in the other half of the milk and mix for another minute or two.  Transfer the batter into a measuring cup with a spout.

    Melt a small amount of margarine in your frying pan.  Pour  very thin layer of batter into the pan, roll the pan around to spread the batter around evenly.

    Here is a picture of my helper.  And yes, she's wearing her pyjamas at 5pm.  It's kind of her thing.


    Cook pancake until golden brown on the bottom and little teeny tiny bubbles appear on the top of the pancake.  Flip the pancake and cook the other side until it is golden too.


    Transfer the pancake to a warmed plate (I used a pizza shaped cookie sheet, warmed in a 350 degree oven).  Sprinkle the top of each pancake with sugar (I just used regular every day sugar, that's how my mom always made them!).  Put in the oven to keep warm.  Repeat the process until all of your batter is gone.  I managed to make 6 shroves out of the one recipe of batter.

    Just before serving, place a teaspoon of jam in the middle of the pancake, roll it up, and sprinkle some more sugar on top.  I think I realize now why my mom only made these one day a year - so much sugar, yummy yummy sugar! My kids are never going to sleep tonight! 

    Now after a deliciously decadent dinner, I have to figure out what I am going to give up for Lent!!  

    Monday 20 February 2012

    A Little Bit of Whimsy


    This weekend we started getting all of the supplies and decorations together for Eila Bean’s 3rd birthday party this weekend!

    I put my army of mini-party planners together to start on the goodie bags, filled with bubbles, candy, and a sweet little goldfish-filled treat bag shaped like a carrot (it is a bunny party!!)
    Since we are having Eila’s shindig in our townhouse amenities room (which is lacking in fun, whimsical decor - shocking, right?) I got right to creating some fun tissue paper pom poms to use for decorations through the room. 

    Using Martha Stewart’s Tutorial and a couple of packages of brightly colored tissue paper from my favourite store (Dollarama!), I poured myself a big cup of tea and got to work.  They look super complicated.  They are not.  From start to finish, each one takes about five minutes. (Pardon the poor lighting, I really need to start crafting in daylight hours so my photos look a little more lively!)

    Start out by taking a stack of 8-10 sheets of tissue paper.  Fold them like a fan, with the folds about 1.5” in width. 

    Trim the edges of the tissue paper so they are rounded or pointed, depending on the look of the flower you would like. I prefer the rounded edged pom poms, but that’s just me  J

    Wrap an 18” length of floral wire around the fan, in the middle.  Start pulling the individual sheets slowly and carefully away from the stack, being careful not to let the tissue paper tear.

    When you pull them all apart, your pompom should look like this:

    So far I’ve made about 8 pom poms, in pinks and purples.  I think I’ll add a few yellow and teal for a nice, bright, cheerful space for the bunny party!

    LinkWithin

    Related Posts Plugin for WordPress, Blogger...