Showing posts with label quest for the perfect cupcake. Show all posts

Wednesday, 10 July 2013

Chocolate Eclair Cake


Hello my friends! I'm back today (after a MONTH away?? How did that happen??)with a recipe!! Last week while aimlessly scrolling on Pinterest I found the most beautiful looking recipe. Now, for an event to make this lovely dessert. Lucky for me (and in turn, all of you) my co-worker and friend starts a new job next week. We are having a big potluck for her, and this lovely cake is my contribution!

I have to admit, I was a little apprehensive about baking the crust, but it turned out golden and gorgeous. And the filling? OH. MY. WORD. The FILLING. It is unbelievable! Soft and light and creamy and glorious. I may have to find a way to make individual éclairs so I can use it in my Quest for the Perfect Cupcake!!

The only issue I ran into was with the chocolate pudding. Since my Walmart didn't have a 5.1 oz box, I ended up buying two regular sized boxes and just keeping the excess pudding out for the girls. Win-Win! Now, without further adieu, here is the recipe!

Chocolate Éclair Cake

Recipe adapted from The Girl Who Ate Everything.com

Ingredients

Crust:
1 cup water
1/2 cup butter
1 cup flour
4 large eggs

Filling:
1 8 ounce package cream cheese, softened
2 102g boxes instant vanilla pudding
4 cups milk

Topping:
1 8 ounce container cool whip (enough to cover the cake, I didn't use the whole container)
Chocolate syrup (you could make your own, but I just used ice cream topping)

Instructions

Preheat oven to 400F. Lightly grease a 9x13 glass baking pan. If the sides of your pan are too heavily greased, the batter will not stick to the sides. Not a huge deal, but it's prettier if the base bakes up the sides.
Here is the crust pre-bake, I tried to pull it the whole way up the sides of the pan
Éclair crust: In a medium saucepan, melt butter in water and bring to a boil, whisking constantly. Remove from heat and use your arm muscles to stir in that flour. At this point, I transferred by batter to my Kitchenaid mixer bowl, because I was worried that I wouldn't be able to mix fast enough - it worked perfectly! Mix in one egg at a time, mixing completely before adding the next egg. Spread the mixture in the pan, covering the bottom and sides evenly. The mixture will be very wet.

Here's the crust after baking, all puffy and golden brown
Bake for 30-40 minutes or until golden brown. Check it occasionally during baking to ensure the crust doesn't burn. Remove from the oven and let cool completely. The crust will likely be puffy and have big bubbles, just leave them, they'll go down on their own.

Filling: Whip the pudding mix and milk according to package directions. When it's all mixed up, remove 1/4 of the pudding into a separate bowl. This excess pudding is not needed for the recipe, so you can enjoy it anytime! Put the pudding into the fridge and wait until it is fully setup before moving on to the next step.

Whip cream cheese in the bowl of your stand mixer. If you don't have a stand mixer, I hope you have strong arm muscles because this process takes a while... Once the cream cheese is nice and smooth, slowly add the pudding to the cream cheese, and continue to whip together. Mix until there are no lumps and the mixture is nice and smooth. This took almost five minutes in my mixer.

When the crust is completely cooled, pour the filling into the crust. Spread out until it is evenly distributed over the entire crust. Top with a layer of cool whip (or if you are really good, some homemade whip cream) and drizzle chocolate syrup on top.

I hope my friend loves this cake as much as I loved making it!! Thanks for stopping by to read today, I really appreciate it!


Linking to Joyful Homemaking, Not Just a Housewife and A Bowl Full of Lemons.

Thursday, 11 April 2013

Vanilla Buttercream Icing

Good afternoon everyone! Hope you are having a super fantastic day!! This is a crazy busy week for our family, it seems like I am running all over town playing chauffeur for the kids – even more than usual!

I found the time to make some super delicious, made with love cupcakes for some special ladies over the weekend. I made a batch for my younger sister’s baby shower on the weekend. These delicious little nibbles were chocolate cupcakes from this recipe, topped with chocolate fudge sauce and vanilla buttercream.

I also made these yummy desserts for a friend’s bridal shower at work this week. These are chocolate cupcakes (again from this recipe), filled with Jello Cheesecake Pudding and topped with vanilla buttercream. I have been asked time and again for my icing recipe, and since it certainly isn’t a trade secret, I thought I may as well share it here for all of you!

I have been making this very basic vanilla buttercream recipe for years. I am not sure where it originally came from, because I don’t need the recipe anymore, it’s stored in my head!

No cupcake is complete without a fancy swirl of icing on top, am I right? The swirl which looks so fancy and difficult is actually really really really easy! I use a 16” featherweight Wilton icing bag (though a smaller one would be fine, I just tend to bake in BIG batches, so I need a BIG bag to hold the icing) and a Wilton 1M icing tip. To make the swirl stand nice and tall, pipe a little wee star in the middle of the cupcake, then pipe in a circle around and over the star. That’s it! See? I told you it was easy!!

This icing recipe will cover 24 regular cupcakes, fancy swirl included!

Vanilla Buttercream Icing

Ingredients

1 cup butter, at room temperature (don’t take it out of the fridge and thaw in the microwave, it never turns out right… just leave it on the counter until it’s nice and soft)
1 tablespoon vanilla extract (yes, one tablespoon!)
4 cups icing sugar
2-4 tablespoons of milk, a splash at a time

Instructions

In the bowl of your stand mixer, beat the butter until light and creamy. Add a tablespoon of vanilla extract and mix another 20 seconds until well combined. Add the icing sugar, one cup at a time, beating between each addition.

When all four cups of icing sugar have been added, leave the mixer a-mixing for another minute or so, you’ll find it will come together a bit more. At this point, add milk, one tablespoon at a time until you reach the desired consistency for your icing. I like my piping icing to hold up, and be sort of the consistency of room temperature butter. If I was using the icing to frost a cake, I would add a bit more milk to thin it out.

Assemble your icing bag, with the coupler and the tip, fill the bag, and get piping!! If you are new to piping icing, lay some wax paper on the counter and practice! Anything you pipe you can throw back into the bag and use again. This icing also colors well. My favourite icing colors are made by Duff. You can also freeze this icing if you make a huge batch and have leftovers. Just put the icing into an airtight container and use it the next time you are baking.


Linking to Joyful Homemaking, Not Just a Housewife and A Bowl Full of Lemons.

Sunday, 13 January 2013

2012 Round Up - Best and Most Loved Posts of the Year

I can hardly believe that it’s been almost a year since I decided to start this little blog. Back in Feb 2012 I wanted to participate in I’m An Organizing Junkie’s big organizational challenge. So I started this site and since then have spent many an evening baking, cleaning and organizing, all while taking photos and documenting the fun for all of you to read about it. 
 
In 2012 I managed to put together 164 blog posts! That seems crazy to me, and some weeks it was crazy! Fun, but a little insane. I’m lucky that my husband works evenings, so I don’t have to feel like I’m ignoring him when I sit under my blanket with HGTV on while blogging on my laptop.

I took a look at which posts were the most popular in 2012, and here is my round up of the most-viewed projects and posts from the past year.

Beef Enchilada Bake
An Organized Command Center
Little Girl Room Organizing
My 29 Day Organizational Success
Dr Pepper Cupcakes
Minimalish Rules
Spring Break Spring Cleaning
Tastes Homemade Box Cake Recipe
End of the Year Teacher Thank You Presents
Chicken Macaroni Bake Freezer Meal
Taming the Hair Ties
Linen Closet Loveliness
What do you think? Are any of these your favorites? 
 
Here are my favorite posts from the past year:
 
Secrets of a Happy Marriage
Butter Chicken Lasagne
Half Marathon Highlights
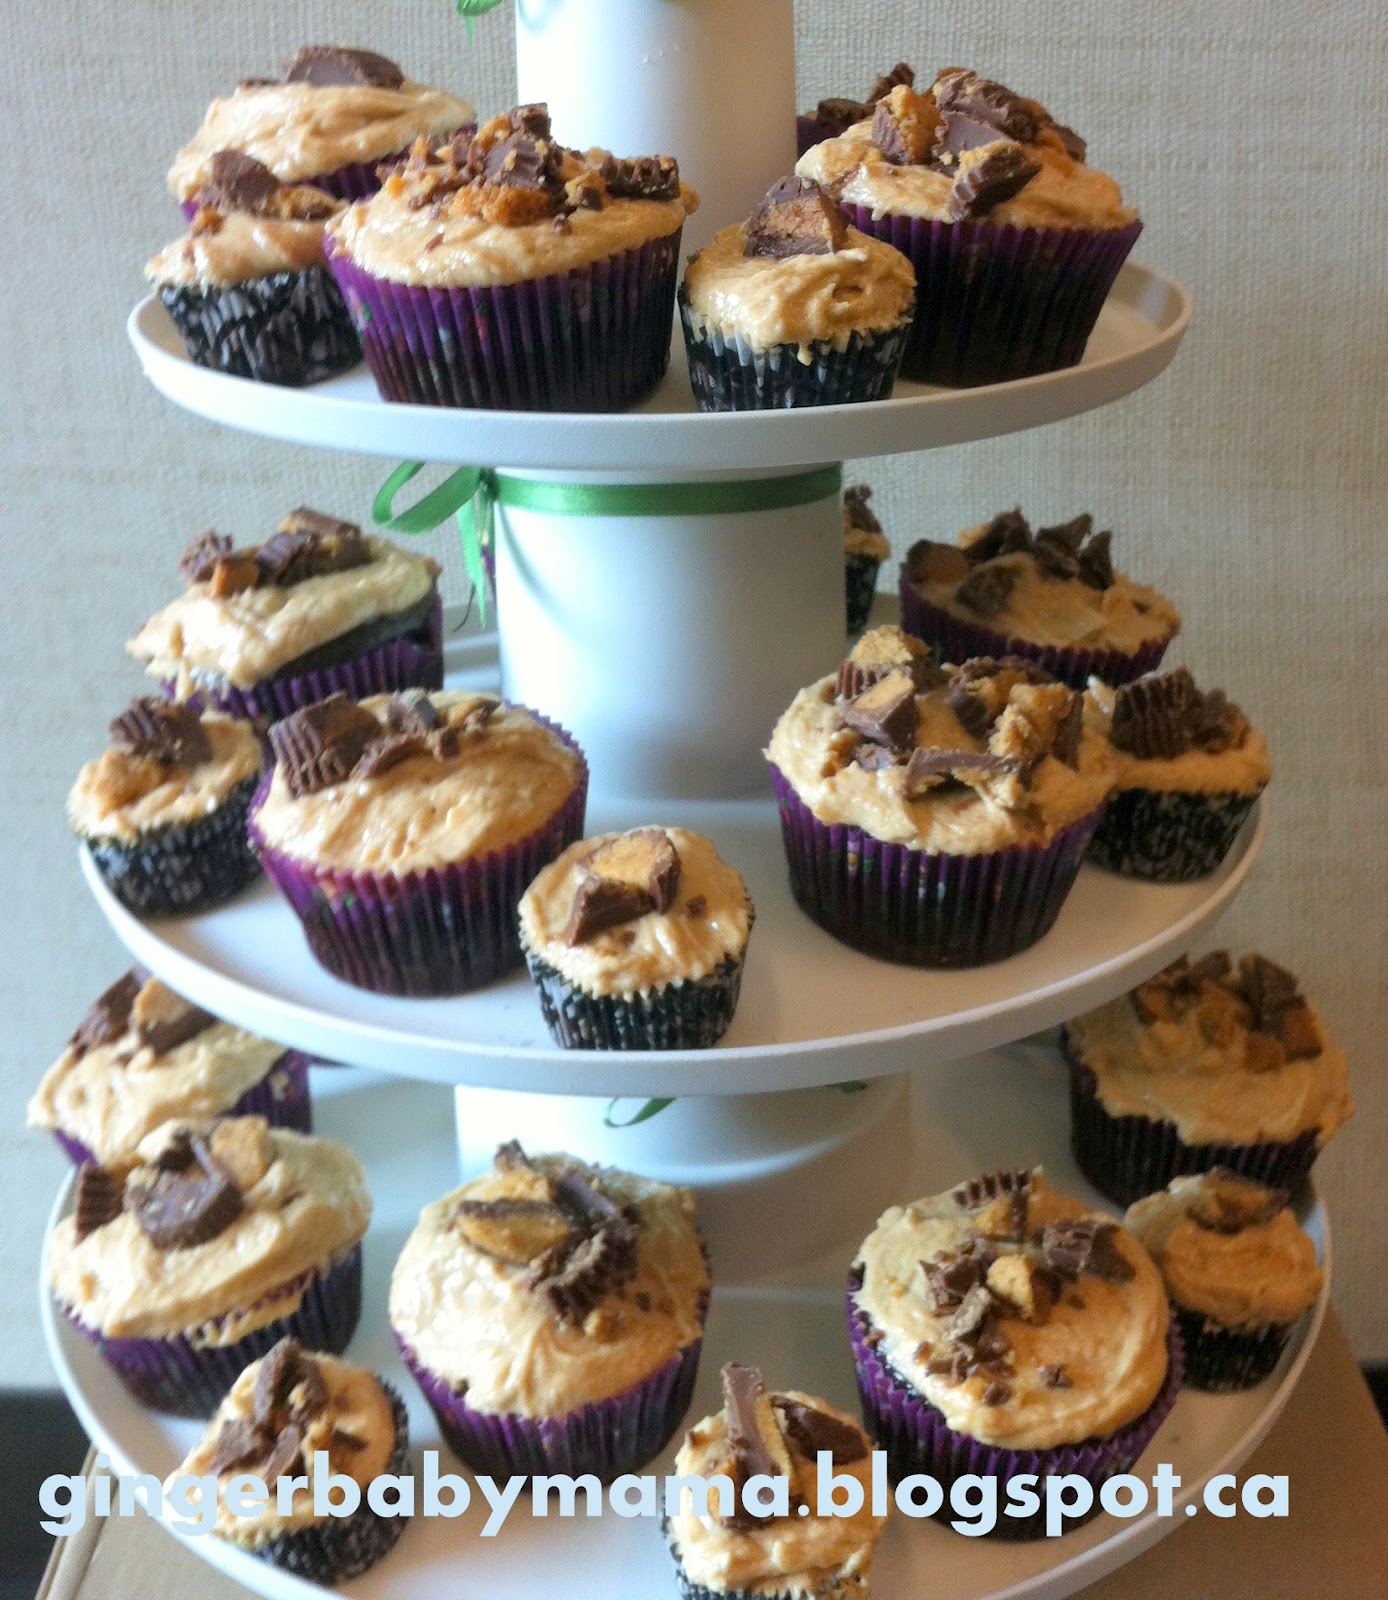
Peanut Butter Chocolate Cupcakes with Fluffy Peanut Butter Frosting
 
Summer of Fun Chart
Turtle Cupcakes
Pasta with Prawns in Boursin Cream Sauce
 
Kindergarten Graduation Presents
Super Amazing Totally Irresistible Chocolate Trifle
I hope you all like what you have seen so far from my little corner of the internet! There are many more fun and exciting things to come!


Wednesday, 24 October 2012

Caramel Apple Spiced Cupcakes with Caramel Buttercream

Aaahhh.. The Quest continues! 
I decided earlier this year to embark on the Quest for the Perfect Cupcake. It has been a great adventure, with some classic cupcakes (Red Velvet Cupcakes with Vanilla Cream Cheese Frosting), some strange (Dr. Pepper) and some perfectly perfect (Peanut Butter Cupcakes and Turtle Cupcakes). I also tested out Pink Lemonade Cupcakes and Dark Chocolate Cupcakes with Salted Caramel Frosting.

When I first put the quest out there I asked for some suggestions. Apple cupcakes were on the request list - and with autumn upon us, Caramel Apple Spiced Cupcakes were definitely on the menu.
I found the basis for this cupcake on Pinterest. It was set up as a cake, but turning the recipe into cupcakes was an easy fix.
I know that I really should have made my own caramel for this recipe, and in the future I probably will (using the recipe from my Turtle Cupcakes) but I just did not have time this weekend. Store bought (gasp!) caramel ice cream topping to the rescue!
Caramel Apple Spiced Cupcakes with Caramel Buttercream and Toffee Bits
Adapted from The Great Cake Company
Makes 48 regular cupcakes
Caramel Apple Spiced Cupcakes
Ingredients
4 cups all-purpose flour
2 teaspoons baking soda
1 teaspoons baking powder
1 teaspoon salt
2 1/2 tsp Apple Pie Spice (I use this one)
1 1/2 cups (3 sticks) butter, cut into 1-inch cubes, at room temperature
2 1/2 cups sugar
2 large eggs
1 tablespoon vanilla extract
4 cups applesauce
Caramel Dessert Topping
Instructions
Preheat your oven to 350F. Line your cupcakes tins for 48 cupcakes. Sift the flour, baking soda, baking powder, salt, and apple pie spice into a large bowl.
In your mixer, beat the butter until creamy, about 4 minutes. Add the sugar and beat until light and fluffy, about 3 more minutes. Add the egg and vanilla and beat until combined.
Add the flour mixture to the mixer bowl, alternating with the applesauce, beginning and ending with the flour mixture. Scrape down the sides of the bowl and mix all ingredients until well combined.
Scoop the batter into the cupcake liners and bake for 20-23 minutes, or until a toothpick inserted comes out clean. Let cool for about ten minutes. 
Spoon about 1 tsp of caramel topping onto each cupcake. Spread around using the back of a spoon. Leave the caramel topped cupcakes to cool completely while you make the icing.
Caramel Buttercream Frosting
1 1/2 cups butter, at room temperature
8 cups icing sugar (I know, it sounds like a lot, but it's for 48 cupcakes!!)
4 tbsp milk
1 tbsp vanilla extract
2/3 cup caramel dessert topping
Skor bits, for decoration
Cream the butter until creamy add vanilla and beat until smooth. Add icing sugar one cup at a time. The mixture will be dry, so add milk 1 tbsp at a time until icing smooths out. Add the caramel dessert topping and mix until well combined.
Using a Wilton 1M tip, swirl icing onto the top of each caramel topped cupcake. Sprinkle the iced cupcakes with Skor bits.
I brought these cupcakes in to work and they were gone!! If you make them, let me know how they turn out!!

Friday, 24 August 2012

Peanut Butter Chocolate Cupcakes with Fluffy Peanut Butter Frosting

Each month in my office we do a “birthday celebration” and a cake, cupcakes or some other treat is brought in (sometimes homemade, sometimes store-bought, all depends whose turn it is that month for planning the party). With our summer staff leaving at the end of August, my name mysteriously was added to the planning list for August!
Along with my name on the list came the request for my chocolate peanut butter cake. I made this earlier this year and it was absolutely devoured by everyone in the office.
As you may know, starting in April, I began the Quest for the Perfect Cupcake. So far I have made Dr Pepper Cupcakes, Red Velvet Cupcakes with Vanilla Cream Cheese Frosting, Turtle Cupcakes – my personal favourite, Dark Chocolate Cupcakes with Salted Caramel Buttercream, and Pink Lemonade Cupcakes.
Recipe
So far, the Turtle Cupcake is as close to perfection as I can imagine, with salty and sweet melted into ooooey goooey perfection. But you never know if you have had the best until you try the rest! So, time to make my famous Chocolate Peanut Butter Cup cake into cupcakes for my friends to rate and decide how they fare on my quest!

Notice that there are a LOT more wrappers than peanut butter cups....
had to taste test, you know, for "quality control"
The best part of these cupcakes is the slightly melty Reese Peanut Butter Cup baked into the middle of the cupcake. When you bite into the cupcake it’s like an extra burst of deliciousness to bring it all together. Topped with fluffy peanut butter frosting and chopped Reese Peanut Butter Cups, and paired with a BIG glass of milk, they are absolutely heavenly!
This recipe made 24 regular and 24 mini cupcakes. You could scale it back to make fewer, or just enjoy the fact that this recipe will make you the most popular girl on the block, in your office and in your entire family!

Melt in your Mouth, Eat Them with a Glass of Milk, Peanut Butter Chocolate Cupcakes with Fluffy Peanut Butter Frosting

Recipe adapted from here 
Ingredients
3 cups of all purpose flour
1 tsp salt
2 cups white sugar
½ cup unsweetened cocoa powder
2 tsp baking soda
10 tbsp vegetable oil
2 tbsp white vinegar
2 tsp vanilla extract
2 cups cold water
1 cup semi-sweet chocolate chips
24 – 36 Reese Peanut Butter Cup Miniatures
Instructions
Preheat oven to 350 degrees F (175 degrees C). Line cupcake pans with paper liners. This recipe made 24 regular and 24 mini cupcakes.
In a large bowl, combine flour, salt, sugar, cocoa powder, and baking soda. Mix well with a fork, then stir in oil, vinegar, and vanilla extract. When dry ingredients are thoroughly moistened, pour in cold water and stir until batter is smooth. Stir in chocolate chips and pour batter into prepared cupcake liners, filled no more than 2/3 full.
Bake in preheated oven for 6 minutes. Remove from the oven and place one unwrapped Reese Peanut Butter Cup Miniature top down into the batter. Put the cupcakes back into the oven for another 12 minutes, or until a toothpick inserted into the edge of the cupcake comes out clean. Cool completely on a wire rack.
**I didn’t put any Reese cups into the mini cupcakes. I didn’t think there would be room, and at the end of it all, once they were iced, they didn’t need the extra peanut butter.
Fluffy Peanut Butter Frosting 
Recipe adapted from here 
Ingredients
1/2 cup butter, softened
2.5 cup creamy peanut butter
6 tablespoons milk, or as needed
6 cups confectioners' sugar
Instructions
Place the butter and peanut butter into a medium bowl, and beat with an electric mixer. Gradually mix in the sugar, and when it starts to get thick, incorporate milk one tablespoon at a time until all of the sugar is mixed in and the frosting is thick and spreadable. Beat for at least 3 minutes for it to get good and fluffy.
I'm sure you could pipe this icing with your favorite icing tip, but I started baking late and by the time it came to ice the cupcakes, I used my mini cookie scoop to plop the icing on and just spread it around a little.  Then, sprinkle with chopped Reese Peanut Butter Cups, and serve!


Weekend Bloggy Reading

LinkWithin

Related Posts Plugin for WordPress, Blogger...