Thursday, 1 January 2015

Dollar Store Art Hack

Hello my friends and Happy New Year!! Hope you all had a safe and fun evening last night. My evening consisted of a Homeland binge watching session and some sparkling wine with the hubs at midnight. A perfect evening as far as I am concerned!

Today I'm sharing with you a dollar store hack that I used to make Christmas presents for my littles. Miss A has been asking to update her bedroom for a few months now. Originally she asked to paint the lower portion of her room green like grass in a field, and the top part of the room blue like the sky, paint a fence and put pictures of horses all over the walls.


That tall order was not going to happen (not right now anyway) but I wanted to bring some horse themed artwork into her room. Rather than shell out big bucks for artwork at Home Sense or Target, I thought I could find a way to do it for cheap. So, off to my favorite store these days - Dollarama!! I picked up a horse calendar and some photo frames and got to work!All in I spent $13 to make four art pieces for my littles; 4 frames at $3 each and a buckeroo for the calendar.


Once I took the stock photo out of the frames, and the matting out, I was able to "frame" out which calendar pages would work out best for my project. I lucked out and found that more than half of the calendar pages would have worked! I picked out the ones I thought the girls would like best (especially since Miss A asked for a real horse that's brown with white spots for Christmas!) and using scotch tape affixed the calendar pages to the matting.

I also put together one other art piece for Miss A that wasn't horse related. Since she isn't exactly a morning person (like at all) I wanted to find a fun quote about being happy. I scoured Pinterest and found this quote that reads "Today is the perfect day to be happy" - it was an ad for a Color Run, and I just cropped the runners out of the bottom of the picture, resized it to fit on an 8 1/2 x 11 page and printed it on cardstock.

Here are some photos of how the prints look in the girls rooms. Pardon the horrendous lighting, I took the pics at night and the chandeliers in the girls room aren't exactly the best sources of light for photos!

Notice anything in this one? My assistant Miss E snuggled herself into the bed disguised as a stuffy. And yes, she actually sleeps with all of those "babies" on her bed each night!

I decided to put the Happy quote on Miss A's wall right at the end of her bed so that when she wakes up for her compulsory 12 minutes of stretching each morning, it'll be the first thing she sees! Here's hoping it works!!

Thanks so much for stopping by to check out my dollar store artwork - maybe it'll inspire you to put some fun pictures up in your house!


Wednesday, 31 December 2014

Happy 2015 Everyone!!

Hello my friends!! I hope you all had a fantastic Christmas holiday with your families! I know I have been enjoying every minute with my family, even when they drive me bananas.
Sorry, don't have a photo credit, it was on facebook :)

As I tuck my littles into bed after watching the ball drop for New Year's Eve in New York (which is 9pm our time), and settle in for a relaxing Homeland marathon binge watching session, I'm reflecting on the amazing year that I've had. Now, not much of that year was chronicled on this blog, but that's something I'm hoping to correct in the future.

Like many of you I am making some resolutions, but hopefully ones that I can keep! Last year our family had one main resolution, and we stuck to it most of the year!! We made a plan for the girls to try new foods, specifically try a little of whatever the hubs and I were having for dinner. For the most part, the girls were brave and tried, and I'm happy to report that our family dinners are much more peaceful and include many more options and even - gasp! vegetables!!

For 2015, our family is going to try another new plan together. Where up until now, this mama packed the lunches, packed the bags, put most things away, made all the plans, picked all the outfits, did the hair and generally organized all our lives. This year, our hope is to instill a sense of pride and responsibility in my girls and get their help to have our home run smoothly.
Here are the littles, after completing one of their Christmas Lego presents!
I found a list of age-appropriate tasks and we are going to put them into place this week, so hopefully we'll have some things under control by the time school starts on the 5th. Wish me luck!!!

I'm hoping to get a few blogs posts put together this week before I go back to work.  I have some organizing projects on the go, another household purge in the works and a couple of recipes to share with you all.  Please check in again soon!

Wishing you and your family a happy new year!


Tuesday, 23 December 2014

Christmas Morning Sanity Saver!


Hello once again my friends!! Can you believe it?? Two posts, two days in a row, and right before Christmas!! It’s a Christmas miracle! Truthfully, I have about ten posts that I could have done this month, but life is crazy, so I’m happy that I managed to get two done!!

One of my biggest pet peeves on Christmas morning…. Scratch that…. One of my biggest pet peeves when I scrapbook/post to Facebook our Christmas morning photos is the big black garbage bag sitting right in the middle of the room, to corral the gift wrap that has been quickly ripped from our Christmas morning presents.

My solution? One of my ugly blue recycling bins and a roll of wrapping paper! Rather than a big old ugly black garbage bag cluttering up my photos, I’ve wrapped a blue recycling bin with my holiday gift wrap, and then, when the girls (and the hubs and I) unwrap all of our treasures, the paper can go straight into the recycling bin! Bonus, the bin being covered in gift wrap makes it pretty. And that makes me happy.

Another few pet peeves? Presents that are impossible to get into, and gifts that need a little something extra.

To keep my sanity (and mild OCD) in check, I found a basket and put some Christmas morning necessities in there!
  • Scissors for opening crazy-wrapped gifts
  • Pliers to open the toys out of the boxes with the insane amount of zap straps manufacturers use to make sure dolls don’t slouch in their boxes
  • My favorite pic-quic screwdriver – you never know what needs to be put together, or to take off battery pack covers
  • Batteries for those gifts that require them, but that are not included in the box
  • My spare camera battery (because knowing my luck, the Christmas eve photos would drain the battery and I’d be using an Iphone to capture my girls’ joy)
  • Scotch tape (in case we accidentally unwrap a gift that we need to re-wrap!!
All of these Christmas morning necessities fit nicely into this little white container from the dollar store, and can be tucked away until we need what's inside.

I hope this post has inspired you to help keep your Christmas morning organized! This season is total chaos, so a few bits of calm and preparedness are like gold!

Monday, 22 December 2014

Christmas Eve Gift Box


I know we’re cutting it close to Christmas, only a few days left, but I’m back with a quick post with one of our Christmas traditions.

Ever since I was little, Christmas Eve always meant new pajamas for my sister, brother and I. When my girls came along, I always made sure that we had new jammies all wrapped up and ready to go for Christmas Eve.

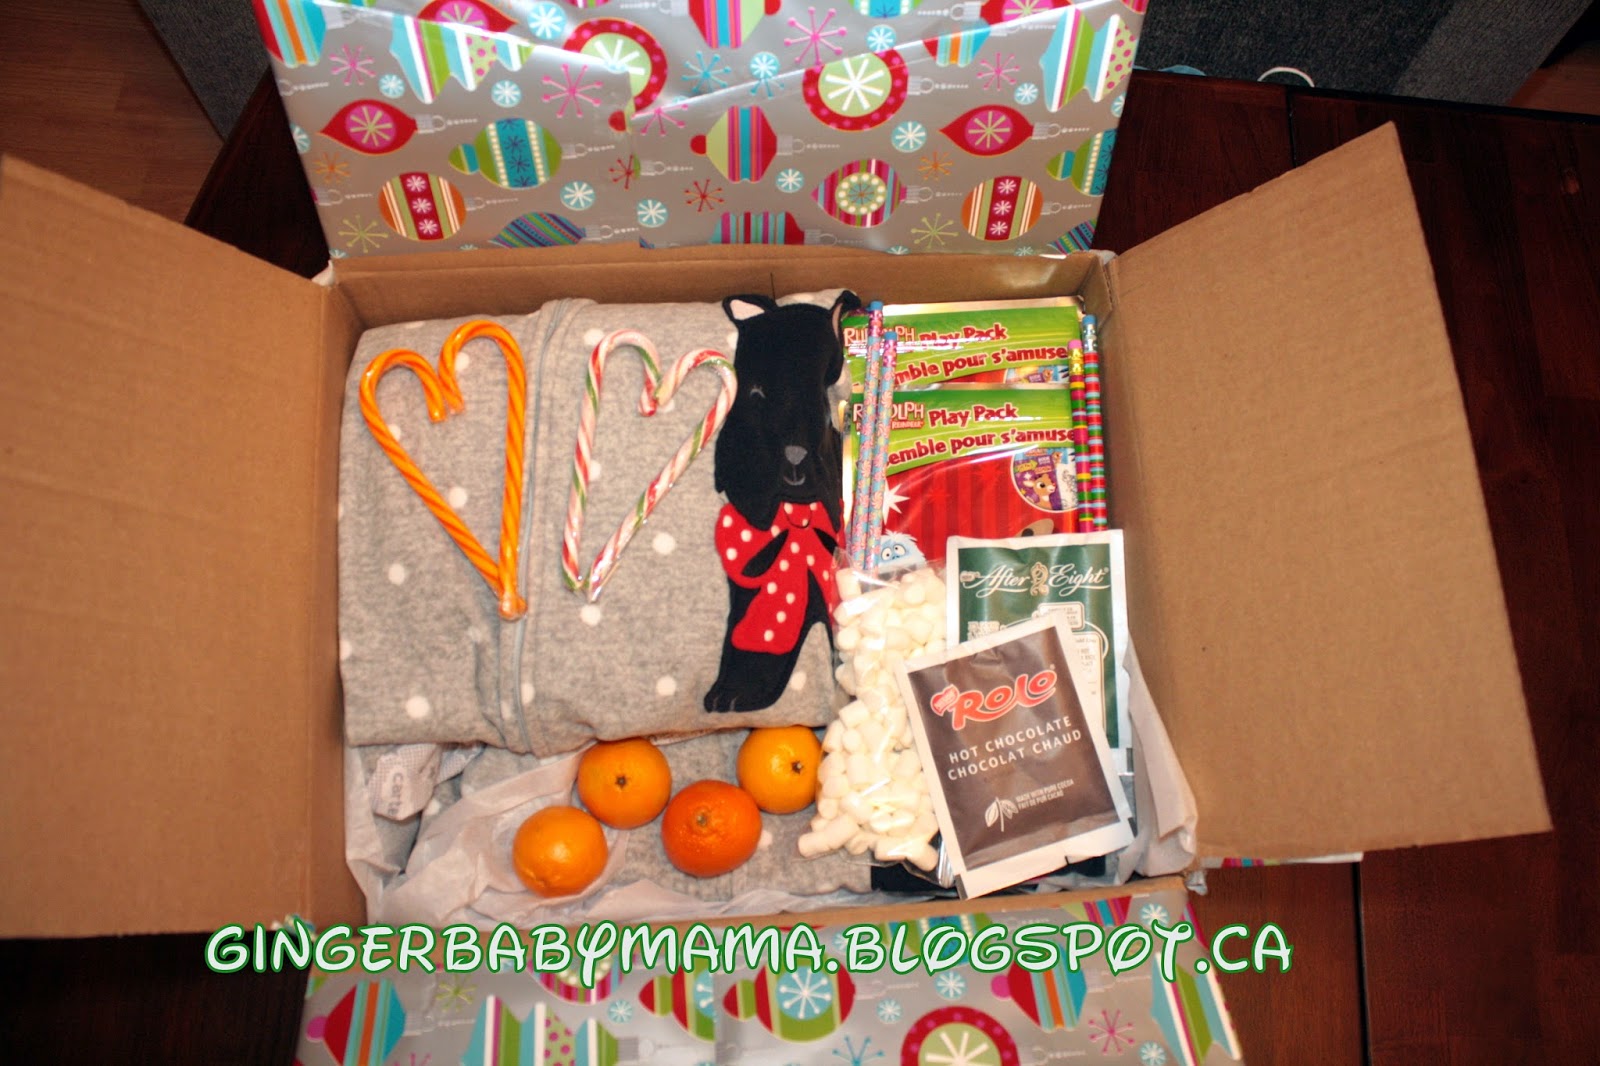
This year, I decided to go one better and put together a Christmas Eve box filled with fun things for my girls and their little cousins to do after Christmas Eve mass. 

I found a box in the house and wrapped it in Christmas wrapping paper and then got to work filling it up! 

I hit up my new favorite place – the Dollar Spot at Target!! There, I found some adorable little craft fun packs and some new pencils for the girls.

Also into the box went some packets of hot chocolate and a bag of marshmallows (we use marshmallows as a hot chocolate topper and as a bribery tool for good behavior!!),

and a few Christmas mandarin oranges. I'm sure the girls are going to love having an extra present to unwrap at Baba's this Christmas Eve!!

Thanks for stopping by my little corner of the internet today!! Merry Christmas!!

Monday, 8 September 2014

Menu Plan Monday - Sept 8, 2014

Hello all my lovely internet friends! Long time no chat! This has been a crazy year so far, and I have to admit that this little blog definitely fell by the wayside. But, it’s the time of year that I get all excited – I got a new mommy planner (yippee!), a schedule full of activities for the girls, and once the strike is settled, back to school! My older gingerbaby is going into grade three and my little one is going into kindergarten (sniff sniff, not sure I’m ready for that!).

We spent our summer mapping out all of the parks and water parks in the surrounding neighbourhoods. Our goal was a new park each week, sometimes two! We also spent a lot of time at our cabin at Black Mountain Ranch. The girls rode horses all summer long and swam, and played and played and played!

The kids lessons all start this week, so I know that if I don’t menu plan, I’ll be heading straight to the drive thru! We have two nights during the week that we have only an hour between activities, so we are going to try some new make-ahead and freeze recipes and some crock pot cooking too! I’ll be sharing my crock pot recipes along the way. Thanks for stopping by, I hope you all have a fantastic week!
 
Recipe for this cheesy concoction

On the menu this week:

Monday: Chicken strips, fries and salad

Tuesday: Crockpot Kung Pao Chicken and chow mein noodles

Wednesday: Tex Mex Lasagne

Thursday: Beef tacos and cheese quesadillas

Friday: Heading down to the cabin – pasta and hot dogs for dinner!

Saturday: Perogies, steak and corn on the cob

Sunday: Miss A’s request – Chicken wings, french fries and salad

I’ll be linking my menu plan up to OrgJunkie’s Menu Plan Monday – check it out!!

Thursday, 24 July 2014

White Chocolate Macadamia Nut Cookies

Hello friends! I hope you all enjoyed my last post, Chocolate Chip Banana Bread with Oats. I certainly had a great time baking them and the girls had a great time eating them! We went through a whole loaf the first day!!

This summer we are trying to do something new each week. We are trying to hit up a new park each and every week, try some new recipes when we can and go on new adventures together. So far we have gone to two new water parks, hit up our local night market for street fare and baked some new goodies together.

I asked Miss A what she would like to bake that we haven't baked before. She was quick to come up with an answer - White Chocolate Macadamia Nut cookies, just like the ones from Subway! So off to my best friend (google!!) to see if I could find someone claiming to make a cookie just like the ones from Subway. I came across the Orgasmic Chef and knew that I needed to try her recipe for no other reason than her website name is amazing!!

This recipe makes a ton of cookies - Miss A had plenty and I brought a whole bunch to work too!


White Chocolate Macadamia Nut Cookies
Adapted from The Orgasmic Chef

Ingredients
3¼ cups flour
1 tsp baking soda
1½ cups salted butter, softened
1½ cups brown sugar
1 cup white sugar
2 eggs
2 tsp vanilla extract
1 cup white chocolate chip
1¼ cups coarsely chopped macadamia nuts


Instructions

Preheat oven to 350F. Line cookie sheets with parchment paper. In a medium bowl, combine flour and baking soda. In the bowl of your mixer, cream together the butter and sugars. Add eggs one at a time, then add vanilla extract. Scrape down the sides of the bowl and mix again.

Slowly add the flour mixture and mix well. Stir in the white chocolate chips and macadamia nuts gently.

Using a medium cookie scoop, drop cookie batter onto prepared cookie sheets and bake for 13-15 minutes.

Thanks for stopping by today! I hope you like this recipe!!


Wednesday, 23 July 2014

Freezer Cooking: Chocolate Chip Banana Bread with Oats

Hello world!! I can't believe it's been seven months since my last post! Life is just so busy and between my two crazy girls and work and my husband I haven't had a spare minute to post!

I did try out a bunch of new recipes, and took photos along the way, so hopefully I'll find some time to get my fingers to type out the recipes for you guys!!

The recipe for today's banana bread is beyond simple! I found it in a book filled with great recipes, specifically for big batch cooking. The book is called "Not Your Mother's Make-Ahead and Freeze Cookbook" by Jessica Fisher. I doubled the recipe and made it twice (so four times the original recipe) and it made EIGHT glorious loaves of goodness. For the recipe below I am putting the original recipe amounts from the cookbook, so it'll make two loaves. I also use foil loaf pans from the dollar store (3 for $1) when baking these, so they are easy to freeze, transport and gift to others.

Today was rainy and the girls and I spent the day cleaning the house and baking and just chilling out. It was a great way to spend the day!

Chocolate Chip Banana Bread with Oats

(Recipe from Not Your Mother's Make-Ahead and Freeze Cookbook)

Ingredients
1 cup sugar
2/3 cup vegetable oil
2 eggs
1/4 cup buttermilk
1 tsp baking soda
1 cup mashed banana
1 1/3 cup flour
1/3 cup oats
1 tsp vanilla extract
1/2 cup chocolate chips, plus another handful to sprinkle on top

Instructions
Preheat oven to 350F. In a large bowl combine all of the ingredients and mix until well blended. Pour the batter evenly between two pans. Sprinkle another handful of chocolate chips on the top, just because chocolate makes me happy.

Bake for about an hour or until a tester inserted in the center comes out clean.

A clear plastic treat bag (like the kind you use for goody bags) fits one of these loaves perfectly. You can seal one up and freeze them this way. It's also perfect for when you are making a bunch of banana loaves for a bake sale or some other fun event.

Thanks for stopping by today, I hope you like this recipe!!

LinkWithin

Related Posts Plugin for WordPress, Blogger...