Another week, another new recipe! Another resounding success!! Tonight Miss E and I tried out a recipe I found on TastyKitchen's site and just knew that this recipe would be delicious. Not healthy by any stretch of the imagination, but delicious!!

In addition to this being a rich, creamy, delicious recipe, it was super easy and required no fancy ingredients (big plus in my book!). So while Miss A was at her second dance class of the day, Miss E and I got to work. We took a rotisserie chicken and between us shredded it with two forks.
The toughest part of the entire recipe was making the sauce. It didn't thicken up as easily as I thought, so I ended up adding more flour as I went to achieve the thickness I was after. Actually, that's not true... the toughest part of putting together this recipe was taking an hour to pull it all together because of my five year old sous chef!! I think if you were to put it together sans sous chef, it would only take about 15 minutes to prep.
Chicken Cordon Bleu Casserole
Recipe adapted from TastyKitchen.com
Ingredients
Casserole Base:
One whole, cooked chicken (I used a rotisserie chicken), shredded
1/2 lb thinly sliced deli ham, roughly chopped
8 slices swiss cheese
Sauce:
1/4 cup butter
1/4 cup flour (+ 1 tbsp more as needed)
3 1/2 cups milk
2 tbsp lemon juice
1 tbsp Dijon mustard
1 1/2 tsp salt
1/2 tsp paprika
1/4 tsp pepper
Topping:
6 tbsp butter, melted
1 1/2 cups Panko breadcrumbs
3/4 tsp seasoning salt
Instructions
Spray a 9x13 dish with cooking spray. Layer the shredded chicken, then the ham and then the cheese in the dish.
For the sauce: in a large saucepan, melt butter. Slowly add the flour to make a roux, whisking the entire time. Once the roux is smooth, slowly add the cold milk, while whisking constantly. Cook over medium heat until the sauce thickens. Stir in the lemon juice, mustard, salt, pepper and paprika. Bring to a low boil and turn off the heat.
Pour evenly over the chicken/ham/cheese layers, making sure to pour it into all the corners.
For the topping: melt the remaining butter in the microwave, pour over the Panko crumbs and seasoning salt until combined. Sprinkle the topping over the casserole evenly. Bake in a 350F oven for about 45 minutes, until golden brown.
I served this recipe with perogies and a salad. It went over pretty well in our house! The hubs and I loved it, and Miss E gave it a thumbs up. Not so much from Miss A, but you can't win them all!!
Thanks so much for stopping by, I hope I've inspired you a little today!


Oh my goodness –is it Monday already?? That weekend just flew by! Thankfully we had some gorgeous weather so the girls and all their friends played outside last night until the streetlights came on (at 5:30pm, but still)!!
I am so excited to share my successes from last week’s new recipes!! I managed to try two of the three on the menu plan and they were both resounding successes!! The third one I’ll put back on this week’s menu plan and hopefully it will be a success also.
The first recipe I tried out last week was a copycat recipe of PF Chang’s Lettuce wraps and they were amazing! Unfortunately the kids wouldn’t have any part of a wrap made of lettuce, but the hubs and I love them. Last night I made Cajun Fettuccine Alfredo, and it was a hit across the board! I managed to remember to photograph the cooking, so I’ll share the recipe with you later this week.
This week’s menu will include SuperBowl Sunday! We will be having a few people over for the big game, so Sunday’s menu will be filled with appies for dinner, my favorite!!
On the menu this week:
Monday: Pizza Night!
Tuesday: Chicken Cordon Bleu Casserole
Wednesday: Fish tacos with homemade guacamole
Thursday: Pasta with meat sauce and garlic bread
Friday: Brinner – breakfast for dinner! Eggs, bacon, hashbrowns, pancakes and toast!
Saturday: Turkey meat loaf, roasted potatoes and beans
Sunday: Appies all day!! Chili cheese dip, chicken wings, potato skins
I’ll be linking my menu plan up to OrgJunkie’s Menu Plan Monday – check it out!!
Hello my friends! I hope you are all having a fantastic day!
In the past few months, since I have gone back to work full time, I have been trying my best to keep our little world running and even though I just keep swimming, I have been feeling like we are just not keeping completely afloat. With the girls in a ton of extra-curricular activities, and grandparents shuttling the littles around to these activities, each week we need to have a whole lot of prep work to survive the chaos.
In order to control the chaos a little bit, our family has made a New Year’s resolution to make my life easier and the teach the girls a little more responsibility. I’ll be the first to admit, I’ve coddled my girls too much. I laid out their clothes the night before school, packed their lunches, prepped and packed their backpacks and dance/brownies/sparks/catechism bags… basically spent a ton of time pre-organizing.
Starting the first week back to school, I made a few little signs to help guide my girls into completing their tasks each morning. I can happily say that for the most part, the girls are being really helpful!! It still takes reminders each day to think about what activities are happening the next day, and what they need to think about packing.
After spending a little time reorganizing my snack and baking cupboard, putting the lunchtime and after school snacks at little people level I hung a “what to pack in your lunch” sign next to the hooks where we keep the lunch bags. This way, while the littles are eating breakfast, they can see their lunch bags, and can think about what they want to pack for their lunches.
I'm happy to say that the girls are doing a great job of packing healthy lunches, filled with food they will actually eat.
This whole organization plan took me about a half an hour to pull together, but has already saved us a ton of time!
What little organizing techniques do you have to make your lives easier?
Thanks for stopping by, I hope I've inspired you a little today!
Wow! Can you believe it’s already Thursday!?! This week has just flown by!! On this week’s menu plan I decided to try three new recipes. The first one was a resounding success (with the adults in the house, the kids would have nothing to do with it, but they are crazy)!
Even better? The whole meal came together in about 20 minutes!! Yippee!! Anyone with a schedule like ours likes a dish that can be prepped, cooked and eaten in less than half an hour.
I have only been to PF Chang’s twice in my life, since the nearest one is almost 3 hours away. Both times, we ordered these lettuce wraps as an appetizer and they were awesome. So when I saw them on Pinterest, I knew that I’d need to make them to see if they truly were as good as PF Chang’s. And they were!! Thank you so much to Damn Delicious for the amazing recipe!
I had to pick up a few things to pull this dish together that I don’t normally have on hand. Thankfully, I didn’t need to use a lot of these ingredients, so they’ll be here for the next time I make it (and there will definitely be a next time!
Just Like PF Chang’s Lettuce Wraps
Recipe from Damn Delicious
Ingredients
1 tbsp oil
1 pound ground chicken or turkey
2 cloves garlic, minced
1 medium onion, chopped
¼ cup hoisin sauce, and more for garnish at the end
2 tbsp soy sauce
1 tbsp rice wine vinegar
1 tbsp ginger (I used minced ginger, but you could use freshly ground too!)
1 tsp Sriracha (or more, to taste)
1 – 8 ounce can water chestnuts, drained and diced (I only used about ½ a can since I’m not a huge water chestnut fan)
2 green onions, thinly sliced
Salt and pepper, to taste
1 head butter lettuce
Instructions
Heat oil in a saucepan over medium/high heat. Add ground chicken or turkey and cook until browned, about 3-5 minutes. Make sure to crumble the chicken/turkey as it cooks; drain excess fat.
Stir in garlic, onion, hoisin sauce, soy sauce, rice wine vinegar, ginger and Sriracha until unions have become translucent, about 1-2 minutes. Stir in water chestnuts and green onions until tender, another 1-2 minutes. Season with salt and pepper to taste.
To serve, scoop several teaspoons of the chicken/turkey mixture into the centre of a lettuce leaf. Drizzle a little extra hoisin sauce on top for a little extra flavour. Wrap your lettuce leaf taco style and enjoy!!
I hope you have enjoyed this recipe!! I know my husband and I definitely did! Maybe next time I’ll be able to convince my kids to eat it (but since it’s wrapped in lettuce, I doubt it!!).
Thanks for stopping by, I hope I have inspired you a little today!
Hello friends! What an amazing weekend!! We were blessed to have NOTHING on the calendar. All weekend long!! Our only commitment was babysitting my nephew for a few hours, but since it was at our house, it was like we had an entire weekend to ourselves. That never happens!
The hubs took Sunday off this week to watch our beloved Seahawks play yesterday – and they won!! So much excitement, our team is off to the SuperBowl! Guess I better start planning a SuperBowl party menu!! The hubs and my dad also spent some time on Saturday constructing new bike storage in my garage! It’s fantastic and I can’t wait to share it with you all!
Last week I felt defeated because I had menu planned to eat out at fast food places twice during the week. We had our first night out at Subway, so we managed to eat healthfully. Our second night out was at McDonalds. Normally I’m not proud of going to Mickey D’s for dinner, but last Wednesday a wonderous thing happened.
After ordering the girls each their chicken nugget happy meal, I ordered an extra cheeseburger. Then I tore it in half and told each little that in order to get ice cream at the end of the night, they had to eat the cheeseburger. GUESS WHAT?!? They did!! Miss E wasn’t too happy that there was sauce on the burger, but Miss A LOVED it!! Hazzah!! After 8 years on this planet refusing to try a McDonald’s cheeseburger, not only did she try it! She liked it! And wants to order one the next time we go out!! It’s the little things that make me happy…
On this week’s menu I’m planning on trying out a couple of new recipes, so I am linking to the original website for the recipe. Hopefully I’ll be able to photograph as I cook, tweak and remake for my family and I’ll be able to share the recipes with you all next week!!
On the menu this week:
Monday: Kale salad, spaghetti and breadsticks
Tuesday: PF Changs Lettuce wraps (and chicken nuggets for the kids)
Wednesday: Turkey enchilada bake (using the recipe link, but with turkey instead of beef!!)
Thursday: Cajun shrimp fettuccine - trying new recipe
Friday: Brinner – breakfast for dinner! Eggs, bacon, hashbrowns, pancakes and toast!
Saturday: Dinner out!!
Sunday: Another new recipe! Chicken cordon bleu casserole
I’ll be linking my menu plan up to OrgJunkie’s Menu Plan Monday – check it out!!
Hello my friends!! Today I have a super amazing, ridiculously easy and crazy delicious recipe to share with you! About a year ago I was home in the afternoon and caught an episode of Steven and Chris. For those of you who don't watch, Steven and Chris is a Canadian talk show that focuses on lifestyle, home decor and cooking. It's quite entertaining and the hosts always make me laugh.
On the particular day that I was watching, the hosts had a baker on the show who has a downtown Vancouver bakery called Butter Baked Goods and she was making a glorious looking recipe called the Dunbar. It was a combination of cookie, chocolate, caramel and deliciousness. I was running out the door as the recipe was being presented, so I pvr'd the episode and finally watched it months later.
Fast forward to May and our social committee at work was having a bake off. Participants were asked to bring 100 mini servings of a baked item and they would be served and judged by the people who came to try the baked goods. I can't remember how I placed at the bake off, but my Dunbar's were all gone and I had a ton of people asking me to share the recipe.
The best part about this recipe (I think) is that instead of needing heavy cream and melting caramels, I was able to use a jar of caramel sauce! I found the one I used at Target for only $3.99. The original recipe calls for dulce de leche, but this sauce does the same thing and the recipe turned out fantastic!
I finally made these again over Christmas for a friend's pajama party and actually remembered to take photos so I could share them with all of you!! I hope you enjoy these as much as I did!!
The Dunbar
Original Recipe from Butter Baked Goods
Ingredients
1 1/2 cups all-purpose flour
1 teaspoon baking soda
1/2 teaspoon salt
1 cup butter
1 cup dark brown sugar
1 1/4 large-flake rolled oats
3/4 cup chocolate chips
1/2 cup pecans, lightly chopped
3/4 cup caramel sauce or dulce de leche
Instructions
Preheat oven to 350F. Line a 9x9 square pan with parchment paper. Trust me, don't skip this step, or you will never get your delicious treat out of your pan! And get a piping bag, the kind that you would normally use to ice cupcakes. This isn't totally necessary but will definitely make your life (and caramel application) much much easier.
Cream together butter and sugar, making sure to scrape the sides of the bowl to make sure it's all incorporated. Mix in the dry ingredients until well combined. Divide the dough in two and press the first half of the mixture into your parchment lined pan. Sprinkle the chocolate chips and pecans over the cookie dough.
Put the caramel sauce into the piping bag. Pipe the caramel sauce over the chocolate chips and pecans. You could try to use a spoon and just scoop it onto the chocolate chips, but from experience, it is gloopy and hard to spread evenly. Take the second half of the cookie dough mixture and sprinkle it over top of the chocolate chip/pecan/caramel mixture. Lightly press down over the caramel mixture.
Bake for approximately 30 minutes, or until golden brown. When it's done, allow to cool in the pan before using the parchment paper edges to lift it out of the pan. Use a long, sharp knife to cut into bars. Make sure to keep the ones at the very edge of the pan for yourself! That part is my favorite!
Thanks so much for stopping by! I hope I have inspired you a little today!
Good morning my friends! I hope you all had a great weekend – mine was completely chaotic, filled with running around, baking, bringing kids to and fro and some pretty amazing football game watching in between (GO HAWKS!!).
Last week was our first menu plan in what seemed like ages, and I’m happy to report that it actually went pretty well!! Five out of the seven nights, the dinner was what we planned, and I was able to bring lunch for work the next day too! Unfortunately with extra dress rehearsal performances and activities planned for this week, a couple of my menu “plans” are going to be take out!! Oh well, I can’t cook every day! I’ll be better next week, I promise… I hope…
This week the girls worked really hard on our “do for yourself” new year’s resolution. Later this week I will be sharing our techniques for getting the girls organized and motivated as well as the organization plan we made in the kitchen to make our resolutions a little easier to complete. I also have a recipe to share, and it’s filled with my favorite things – chocolate and caramel!! Thanks for stopping by, I hope you all have a fantastic week!
On the menu this week:
Monday: Dinner on the go!
Tuesday: Perogies, turkey meatloaf and balsamic glazed carrots
Wednesday: Dinner on the go, again!
Thursday: Pasta with meat sauce and garlic breadsticks
Friday: Chicken stir fry, spring rolls and rice
Saturday: Turkey pot pie
Sunday: Pork roast, potato wedges and a mixed salad
I’ll be linking my menu plan up to OrgJunkie’s Menu Plan Monday – check it out!!
Hello my friends! Hope you are all having a great week! I've got a couple of sick chickens in my house today, so instead of spending the afternoon at the dance studio, we girls were all home together for some chicken soup, couch cuddles and coloring.
This year, Miss A has joined brownies, just like I did when I was a little girl. She is absolutely loving it as much as I did when I was young and has already earned a ton of badges! While the badge-earning makes me a super proud mama, I've been spending a ton of time sewing all those badges onto her sash. You'd think after all these years, the badges would be iron-on to speed things along, but alas, still need to break out the needle and thread when she comes home with newly earned badges of honor.
Along with brownie meetings and badges comes the super fun camping adventures. This weekend, Miss A's troupe is going to a Camp Skills training day. What a great idea!! The girls will learn all about putting up tents, camp cooking and outdoor safety. They are going to have so much fun. When reading the list of things the girls need to pack along to their training day, one of the items on the list was a "sit-upon." Now, what, pray-tell is a "sit-upon"? It's like a seat that the girls can tote along and bring the camp fire to sit-upon so they don't get wet or dirty.
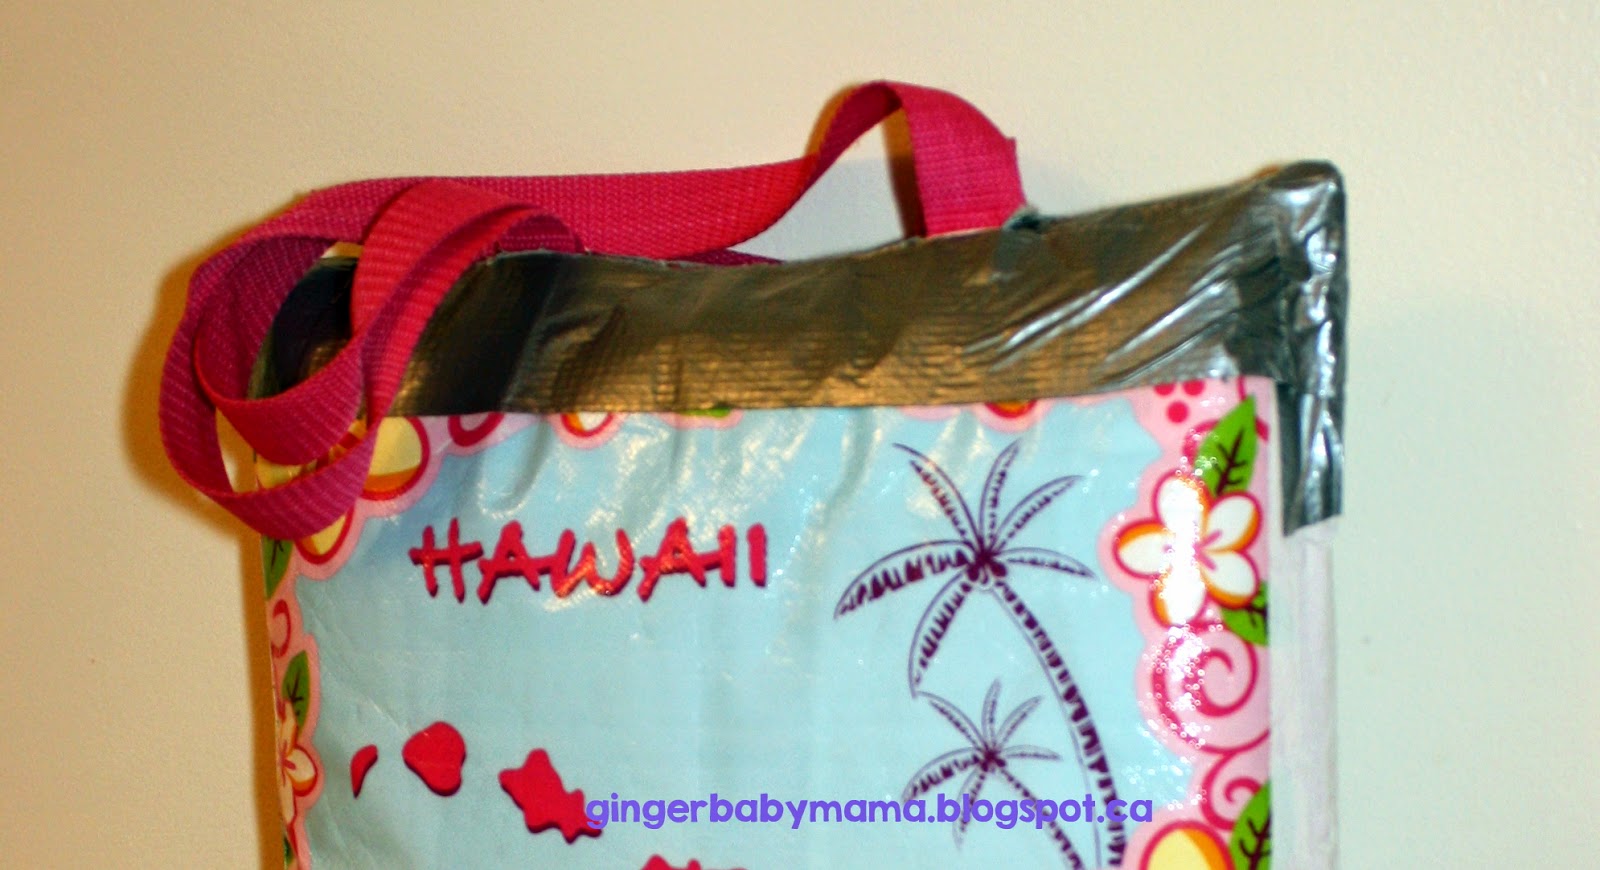
Our leaders suggested that a sit-upon could be made by folding newspaper into a ziplock bag, I knew that we'd have to find a way to make it cuter and more comfy for my little diva. I needed it to be fun, functional and not so heavy that Miss A wouldn't be able to easily carry it along with the rest of her camp gear.
After browsing Pinterest for some ideas, the girls and I gathered the following supplies:
* one vinyl shopping bag (for its waterproof-ness)
* old newspapers & magazines
* a small pillow
* duct tape
After duct taping together the sides of the vinyl shopping bag so it wouldn't be too wide, Miss A got to work stuffing the bag. She put the newspapers on one side and the pillow on the other, making sure to pull the pillow edges right down to the bottom of the bag.
Once it was all filled up, we used more duct tape on the top and bottom to make the bag into a pillow-like shape.
We made sure to leave the straps of the shopping bag on the outside of the package to make it easy to tote around the camp site. Here's a picture of Miss A with her newly assembled sit-upon - she can't wait to sit upon it this weekend!!
Thanks so much for stopping by, I hope I've inspired you a little today!


 Spray a 9x13 dish with cooking spray. Layer the shredded chicken, then the ham and then the cheese in the dish.
 For the topping: melt the remaining butter in the microwave, pour over the Panko crumbs and seasoning salt until combined. Sprinkle the topping over the casserole evenly. Bake in a 350F oven for about 45 minutes, until golden brown.
  I served this recipe with perogies and a salad. It went over pretty well in our house! The hubs and I loved it, and Miss E gave it a thumbs up. Not so much from Miss A, but you can't win them all!!


