Showing posts with label Christmas. Show all posts

Wednesday, 25 November 2015

How to Host a Successful Christmas Cookie Exchange

One of my favorite Christmas traditions is coming up next week! This year will mark the 10th Annual Christmas Cookie Exchange that I will be hosting at my house! It’s a day for us ladies to get together over tea or wine and have appies and catch up, all while trading our new or favorite holiday cookie recipes!!

If you have never been a part of a Christmas Cookie Exchange, let me tell you how it works!! It’s surprisingly easy and a LOT of fun!! Basically, each person who attends the party brings six dozen of their favorite type of cookie, then we make the exchange and everyone brings six dozen different cookies home!!

Ten years ago when I hosted my first cookie exchange, I wasn’t really sure how it worked, so I googled, and found this page . This site gave me a very specific set of rules that, for the first couple of years I was very specific about following… and honestly some of the rules were a little too much for me, so I have relaxed them into the rules below and things have gone much more smoothly ever since!

Recipe for these beauties
Before the rules, a few tips to make your life easier as the hostess of the cookie party!! First of all, give LOTS of notice! I usually send out my invitations (usually as a facebook event) about a month or so before the party. People have very busy social calendars, and if they know about this event well enough ahead, they can also plan to make time for the baking part of the party!! Although some people get stressed about having to bake 6 dozen cookies, remember: that usually just means two batches of a single recipe, since most cookie recipes make 3 dozen cookies!!

Second: Don’t stress!! This is supposed to be a fun event!! I usually have my Christmas tree up mid-November, so my Christmas décor is the only decorating I do for the party, well aside from the beautiful cookies all my friends bring along!! I buy or make a few easy appetizers, open a few bottles of wine and make a pot of tea and we just sit and chat and catch up with each other!

If you have the time, ask your friends to provide you their recipes ahead of time and put together a Cookie Book. It sounds like a lot of work, but it’s super easy and your friends will thank you! When I hosted my first cookie exchange, I asked people to bring copies of their recipes, so if someone LOVED a cookie, they’d be able to bake it! Inevitably, people would forget, so I try to collect everyone’s recipe the week before and print them all off into a little booklet for my guests to bring home! Voila, ten minutes of copying and pasting into a Word document and all of our new favorite recipes in one place to share!!

Finally, I know that people are busy, but busy people still want cookies!! I allow people to bake their cookies and drop them off to me before the party and I will do the exchanging part for them. Last year I had one participant in labour, and another working and one more that had a different party to attend… but they all wanted to bake and exchange cookies, so they brought them over before the party, prepackaged and ready to go and I exchanged their yummies for them! One last thing that may make your life as Cookie Party hostess a little better… and by no means is this necessary, it’s just my OCD coming out to play… if you have an odd number of participants, and you won’t be able to evenly divide cookies (for example 11 people x 6 dozen (72) cookies = 6.54 of each recipe per participant) whip up an extra batch of cookies.

See how amazing having twelve different types of cookies can be????
As the hostess, you are likely already a baker and have a ton of recipes in your arsenal. In addition to making it easier to divide and package cookies (especially when many of the guests pre-package their cookies), if you bring two entries to the party, you LEAVE with double the cookies!!

So, without further ado, and using guidance from Robin’s Rules to Hosting a Cookie Exchange, here are my…


1. All cookies should be homemade, baked and main ingredient must be a type of flour. This means your guests will bring COOKIES. Not Rice Krispie treats, not meringues, COOKIES. After all, this is a Cookie Exchange!!

2. No plain chocolate chip cookies, cookie mixes, no-bakes, meringues or bars. Anyone can open a package and add an egg, this party is for cookies made with love. We allowed bars one year, and they didn’t cut well, they weren’t evenly sized, and they didn’t package and stack like cookies.

3. Please bring 6 dozen total cookies… well maybe a couple extra to share… but really, six dozen cookies. One recipe baked twice, 72 cookies. It makes it easier for sorting and separating when the actual exchange part of the party, and means that no one is shorted cookies because someone only managed to bake 60 cookies.

4. Email a copy of your recipe before the party (or bring recipe to the party). In addition to putting together a Cookie Book like I do, having everyone provide their planned recipes in advance means that you won’t get duplicates. Not that having four kinds of shortbread is the worst problem to have, but variety is the spice of life!!

5. If you don't have time to bake, or have burnt your cookies, but still want to attend, you must go to a real bakery and buy 6 dozen yummy cookies. This one is pretty self-explanatory! In all of my years, it’s only happened on time that someone had to bring bakery cookies!!

I am so so so looking forward to this year’s festivities!! This year’s Cookie Book already has recipes for Oreo Peppermint Crunch Cookies and Salted Caramel Stuffed Snickerdoodles. I. Can’t. Wait!!!!!! Thanks for stopping by today! I really appreciate it!!

Thursday, 12 November 2015

Staying Organized through the Chaos of Christmas

Hello my lovely friends! I hope you all have had a wonderful week so far! Our family went to honour our veterans at a beautiful Remembrance Day ceremony yesterday. The weather was gorgeous, the kids were on their best behaviour, and we got to spend the day together after the ceremony. All in all, a fantastic day! It’s always been a tradition in our house to hold off on decorating for Christmas until after Remembrance Day. So I can’t say that I was shocked when the girls asked if we were putting up our Christmas tree on the drive home from the Cenotaph!

I don’t think we will actually have time to start our Christmas decorating until at least this weekend, but I thought I would bring together some of my favorite tips and tricks to make the Christmas season more organized and less stressful! Since, as of today there are only 42 days until Christmas, I’m sure that many of us are getting ready to panic!! Crazy parking lots at the mall, a bazillion people fighting to find the perfect gift, Black Friday sales.... The chaos of Christmas is enough to make us all crazy!!! I thought it would be fun to share with you all how I (try to) stay organized through the chaos!!


Make a list, and check it twice! Christmas is expensive! I keep a spreadsheet each Christmas that lists everyone I have to buy for, how much I plan to spend, and a column to note whether or not I have actually purchased the gift. I keep pretty much the same list, from year to year, (adding on new nieces and nephews as needed!) just needing to change up the number of neighbours and teachers to buy for, as well as any gift exchange names as needed.

Link
Organize your wrapping supplies! Since our tree will be going up pretty soon, I’ll need to get started on wrapping all of the Christmas presents I have already bought and have hidden away! Taking 15 minutes to gather all of my gift wrapping necessities and organizing them will keep me sane when I feel like I’m drowning in gift boxes and glitter!!

Link

Think of a theme! Every year I try to pick a theme when planning the gifts for my husband and kids. Last year, since the girls were getting into horseback riding and taking lessons, we did a Cowboy Christmas – everyone got Taylor Swift tickets, cowboy boots and riding helmets for Christmas! I even made inexpensive horse-themed artwork for the girls’ rooms! This year, since we are heading to Disney at the end of February, we are working on a travel theme!

Link
Keep the traditions strong! Life is crazy, but I feel like it’s my job as a wife and mother to make my family’s Christmas experience amazing every year. A few years ago, we created this Advent Activity Calendar to give us a fun, inexpensive holiday activity each day in the month of December. Being totally honest, this year I have had to really plan out our activities, so they work in line with the girls’ dance and Sparks/Girl Guides schedules, but knowing that each day we get do so something fun is amazing… I just need to plan a “Fancy Hot Chocolate with Sprinkles” date on days were we double up on dance!

Link
Don’t forget to read!! Another fun, easy thing we do at this time of year is create a basket of books gift wrapped under the tree! Each book is numbered (1-24, obviously!) and each night at bedtime, we get a fun little Christmas/winter themed story. I love that these used to be books that I would read to the girls, and now they are reading to me!

Link
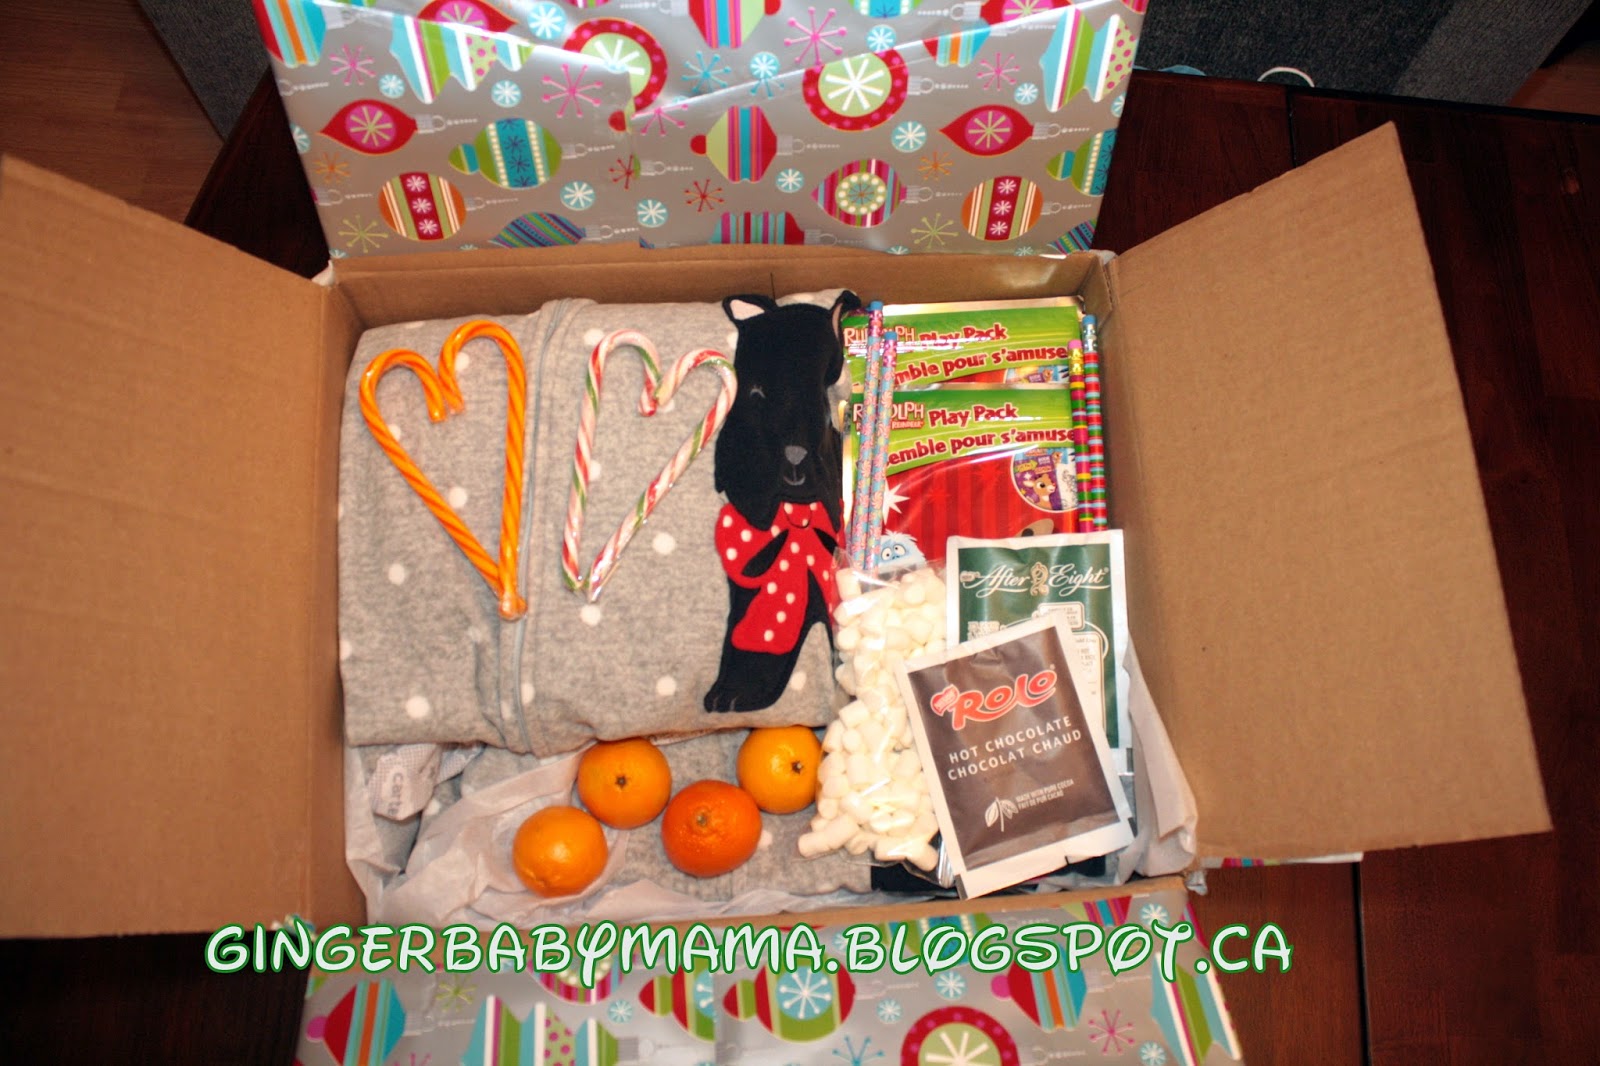
Make a Christmas Eve Box!! Since I was a child, I can always remember my mom giving us new jammies on Christmas Eve. I’ve always done the same with my girls, but last year I made Christmas Eve a little extra special by wrapping up a box with the new jammies, some candy canes, hot cocoa and marshmallows and some Christmas crafts!

Link
Save your sanity on Christmas morning! After spending the month of December getting organized, shopping til you drop and wrapping presents until the wee hours of the morning, there is nothing worse than having one of your gifts require a special tool, or batteries that aren’t included, and don’t even get me started on the wrapping paper!! Save yourself on Christmas morning by preparing a bin to recycle your gift wrap and a kit with tools to open gifts, batteries to get things started and extra batteries for your camera!

Well there you have it my friends, a super long version of how I keep myself from going crazy in the 42 days between now and Christmas morning! Thanks so much for stopping by today, and Merry Christmas!!

Tuesday, 23 December 2014

Christmas Morning Sanity Saver!


Hello once again my friends!! Can you believe it?? Two posts, two days in a row, and right before Christmas!! It’s a Christmas miracle! Truthfully, I have about ten posts that I could have done this month, but life is crazy, so I’m happy that I managed to get two done!!

One of my biggest pet peeves on Christmas morning…. Scratch that…. One of my biggest pet peeves when I scrapbook/post to Facebook our Christmas morning photos is the big black garbage bag sitting right in the middle of the room, to corral the gift wrap that has been quickly ripped from our Christmas morning presents.

My solution? One of my ugly blue recycling bins and a roll of wrapping paper! Rather than a big old ugly black garbage bag cluttering up my photos, I’ve wrapped a blue recycling bin with my holiday gift wrap, and then, when the girls (and the hubs and I) unwrap all of our treasures, the paper can go straight into the recycling bin! Bonus, the bin being covered in gift wrap makes it pretty. And that makes me happy.

Another few pet peeves? Presents that are impossible to get into, and gifts that need a little something extra.

To keep my sanity (and mild OCD) in check, I found a basket and put some Christmas morning necessities in there!
  • Scissors for opening crazy-wrapped gifts
  • Pliers to open the toys out of the boxes with the insane amount of zap straps manufacturers use to make sure dolls don’t slouch in their boxes
  • My favorite pic-quic screwdriver – you never know what needs to be put together, or to take off battery pack covers
  • Batteries for those gifts that require them, but that are not included in the box
  • My spare camera battery (because knowing my luck, the Christmas eve photos would drain the battery and I’d be using an Iphone to capture my girls’ joy)
  • Scotch tape (in case we accidentally unwrap a gift that we need to re-wrap!!
All of these Christmas morning necessities fit nicely into this little white container from the dollar store, and can be tucked away until we need what's inside.

I hope this post has inspired you to help keep your Christmas morning organized! This season is total chaos, so a few bits of calm and preparedness are like gold!

Monday, 22 December 2014

Christmas Eve Gift Box


I know we’re cutting it close to Christmas, only a few days left, but I’m back with a quick post with one of our Christmas traditions.

Ever since I was little, Christmas Eve always meant new pajamas for my sister, brother and I. When my girls came along, I always made sure that we had new jammies all wrapped up and ready to go for Christmas Eve.

This year, I decided to go one better and put together a Christmas Eve box filled with fun things for my girls and their little cousins to do after Christmas Eve mass. 

I found a box in the house and wrapped it in Christmas wrapping paper and then got to work filling it up! 

I hit up my new favorite place – the Dollar Spot at Target!! There, I found some adorable little craft fun packs and some new pencils for the girls.

Also into the box went some packets of hot chocolate and a bag of marshmallows (we use marshmallows as a hot chocolate topper and as a bribery tool for good behavior!!),

and a few Christmas mandarin oranges. I'm sure the girls are going to love having an extra present to unwrap at Baba's this Christmas Eve!!

Thanks for stopping by my little corner of the internet today!! Merry Christmas!!

Tuesday, 19 November 2013

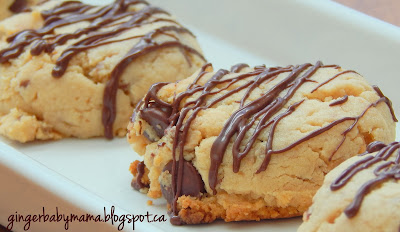
Peanut Butter Heath Bar Cookies

Hello my friends! Long time, no see! Life has been crazy busy, but lots of fun. I have had so many adventures in the past few months, but unfortunately not a ton of time to chronicle our fun.

I'm back today with another fun recipe for you all. For the eighth straight year, I am hosting a (very strict) cookie exchange. I invite a few of my nearest and dearest and we all bake up 6 dozen cookies. As much as possible, I try to limit the cookie recipe types so we don't end up with five kinds of shortbread (that happened one year!) so we have a big range of cookies. This year the list is shaping up quite nicely. I'll be sure to report in with all the goodies after the party.


Anyhoo, back to today's recipe. I tried a test batch of the recipe today to make sure that these cookies were as amazing as the recipe made them out to be. They are de-lish!

Peanut Butter Heath Bar Cookies

Adapted from a recipe in this book


Ingredients

2/3 cup crunchy peanut butter
1/2 cup butter, softened
1/2 cup white sugar
1/2 cup packed brown sugar
1 egg
2 cups flour
3 tsp baking powder
1/2 tsp salt
1/2 cup Heath bar bits (or Skor bits)
3/4 cup + 1/4 cup chocolate chips
1 tsp shortening

Instructions

Preheat oven to 375F. In the bowl of your standing mixer, combine peanut butter, butter, white and brown sugars and mix until creamy and smooth. Beat in egg until combined. Combine flour, baking powder and salt in a bowl. Add dry mixture to peanut butter mixture and mix until well incorporated. Add the Heath bar bits and 3/4 cup chocolate chips.

Using a medium cookie scoop, drop onto a parchment lined cookie sheet. Bake for 8-10 minutes, until the edges of the cookie just begin to brown. Remove from the oven and squish just a little bit with the back of a fork.  Allow to cool on cookie sheet for 10 minutes.

At this point, it would make your life much much easier if you shifted all of the cookies onto one cookie sheet, with little to no gap between the cookies. In a small glass bowl, combine remaining 1/4 cup chocolate chips and 1 tsp shortening. Microwave in 20 second increments, stirring between each heating. When the mixture is stirred completely smooth, head back to your cookies. Using a fork, lightly drizzle the melted chocolate over the cookies.

I hope you enjoyed this recipe! They were certainly popular in my house today - half of the batch is gone already!!!


I will hopefully be linking this recipe up to A Bowl Full of Lemons, Delightful Order, Doodles and Stitches and Joyful Homemaking.

Friday, 18 January 2013

Hot Chocolate Stirring Spoons

Here’s how this post was originally written: It’s almost the end of 2012! Can you believe it! I can’t believe how quickly the year has flown by! The kids only have a few days left of school, so I only have a few days to finish putting together the Christmas presents for their teachers!

Clearly I didn’t find the time to edit photos, and actually create this post until today, but I had a lot of fun putting these together and I think it would be easy to do these as a Valentine’s Day gift for friends or teachers!

On my massive Christmas shopping weekend, I found some adorable hot chocolate canisters at Costco. I picked up three packages and tried to come up with something yummy and homemade to go with them. After perusing my favourite inspirational website  I found the perfect thing! Hot chocolate spoons!

My friend Alana mentioned to me that she used her mini Crockpot to melt the chocolates for her Peanut Butter Balls.
Since I wanted to use more than one type of chocolate, I put a few glass jars into the crockpot, put a couple of inches of water into the pot (being extra careful not to get any water into the jars, it’ll make the chocolate seize up and die) and in 20 minutes, voila! A whole bunch of kinds of chocolate, perfectly melted and ready for dipping!

For my Hot Chocolate Spoons, I gathered up a bunch of ingredients I already had on hand – all I had to buy was the plastic spoons! I used semi-sweet chocolate chips, white chocolate chips, butterscotch chips and milk chocolate chips. 

For the toppings, I used micro-mini marshmallows like these, Christmas coloured sprinkles, Heath bar chips, and mini chocolate chips.

Once the chocolate was all melty and smooth, I got to dipping! The trick with these babies is to swirl the plastic spoon around in the jar until it’s completely covered, then tap the excess chocolate off of the spoon using the inside of the jar. I had a cookie sheet covered in wax paper to use as the resting plac e for the spoons. Once they were dipped, I would sprinkle them with a little bit of goodness. 
 
My girls liked the look of the white chocolate with Christmas sprinkles and the semi-sweet chips with the micro marshmallows the best! 

I put four of the chocolate spoons into a plastic treat bag, wrapped it with a pretty tie. I put the chocolate spoons with the hot chocolate canister and some super-delicious Toblerone Shortbread and wrapped them up all pretty. I had the girls each write a card to their teachers and they were all ready to go!

It would be so easy to switch these hot chocolate spoons to use them for Valentine's gifts by using hot pink heart shaped sprinkles or even crushed candy canes for red and white color.  I hope you have enjoyed these quick and easy gifts for teachers, neighbours and friends. Sorry that I didn’t get around to posting them until after Christmas!!!


I’m hoping to link this post up to a couple of fun link parties:

A Bowl Full of Lemons


Delightful Order

Think Tank Thursday

Monday, 7 January 2013

New Year, New Menu Plan - Jan 7, 2013

Eila Bean and her birthday cake for Jesus!
Hello everyone! I’m finally back!! I hope you all had a wonderful Christmas and a Happy New Year. My little family spent the entire month of December having a blast completing all of the items on our Advent activity calendar. We saw Christmas lights in our jammies, we made a birthday cake for Jesus, we watched Christmas movies and drank a LOT of hot chocolate!
My girls decided to leave Santa chips and cheesy salsa - he gets too many cookies!
I was lucky enough to be off work for almost the entire two weeks the kids were off of school. Miss A’s class put on an adorable Christmas concert (though all the songs were about winter, none actually about Christmas), Miss E’s class had a classroom party and I got to hang out and see her play with her little friends and eat snowman cupcakes.

Have you taken down your Christmas decorations yet? After putting ours up mid-November, and having a ton of presents and toys filling the living room, it was such a great feeling deconstructing Christmas. I was really conscious of only putting up the decorations that I truly loved and that had a place in our home this Christmas, so putting Christmas away was really easy!
Sorry for the iPhone pics in this post, I haven't downloaded all of my photos from the real camera!!
Over the weekend, when trying to plan out the menu for this week I decided to clean out and organize our freezers. Mostly this was because I bought groceries and when I opened my mini-deep freeze there was no room for the newly purchased pizzas!

I used the trunk of hubs’ car as my sorting table and pulling e-v-e-r-y-t-h-i-n-g out of the deep freeze. As I was going along, I took an inventory on my iPhone of what kinds of food in the freezer. I was surprised to learn that I had four bags of perogies, ELEVEN bags of French fries (I stock up when they go on sale for $1 a bag!) and a few bags of chicken breasts (I thought I was completely out!).

The next thing on the list was menu planning! I printed out a blank January calendar, and started plugging in recipes using ingredients from the freezer inventory! I now have an entire month of dinners planned out and will hopefully be spending very little on groceries this month! I’m also hoping to maybe squeeze in a freezer cooking day at some point this month, but that would be a bonus!!
Recipe for this amazing dish

On the menu this week:

Monday: Perogies and sausage
Tuesday: Teriyaki Chicken Stirfry with Noodles
Wednesday: Lasagne Wednesday
Thursday: BBQ chicken breasts, potatoes and corn
Friday: Butter chicken and steamed rice
Saturday: Dinner out!
Sunday: Tortellini with prawns in boursin sauce

I will be linking my menu up with Org Junkie’s Menu Plan Monday. Come check it out for hundreds of recipes and meal ideas!

LinkWithin

Related Posts Plugin for WordPress, Blogger...